Keeping your kitchen knives sharp makes them easier, faster, and more fun to use. Even though it sounds backwards, a sharp knife is also safer because it cuts with less pressure and is less likely to slip.
But choosing a knife sharpener is confusing. You’ve got cheap pull-through sharpeners, expensive electric sharpeners, whetstones, fixed-angle systems, belt sharpeners, and newer rolling sharpeners.
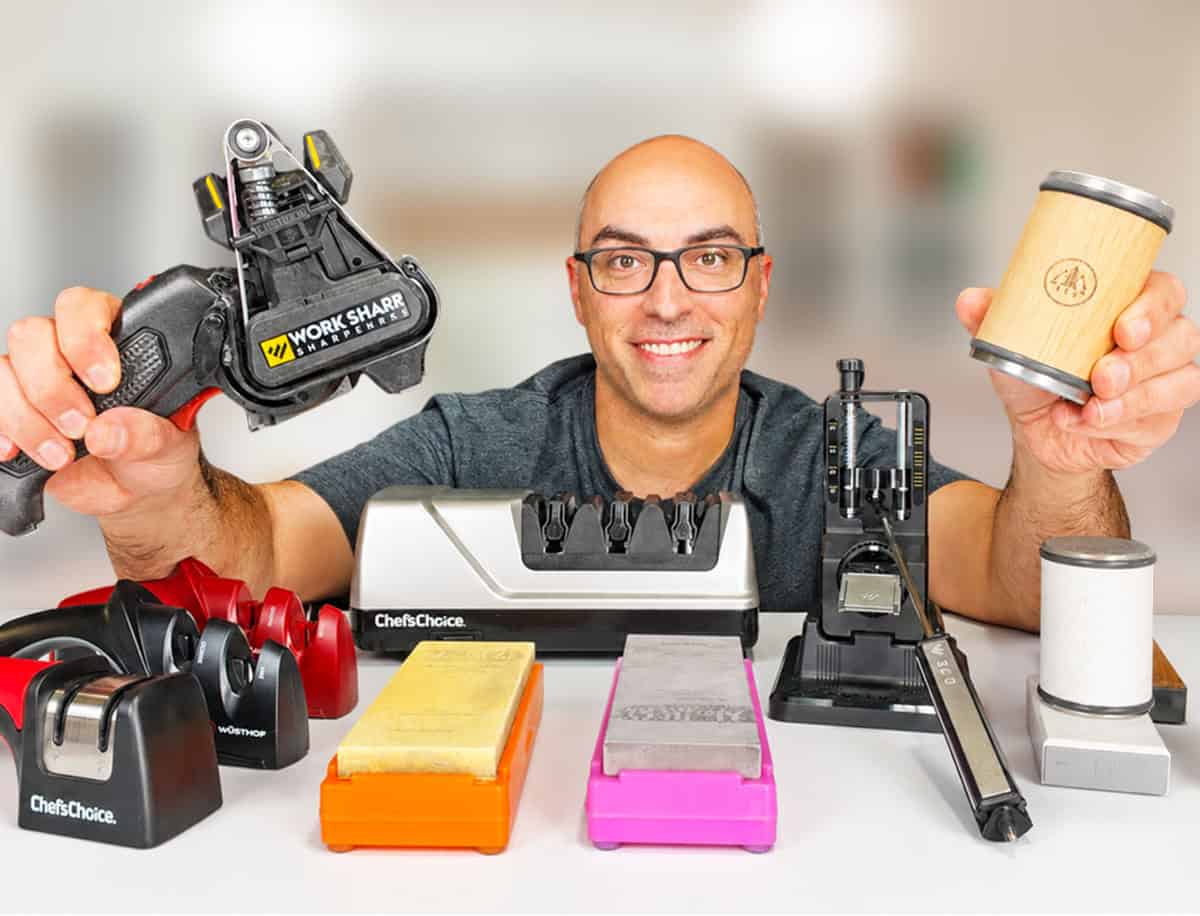
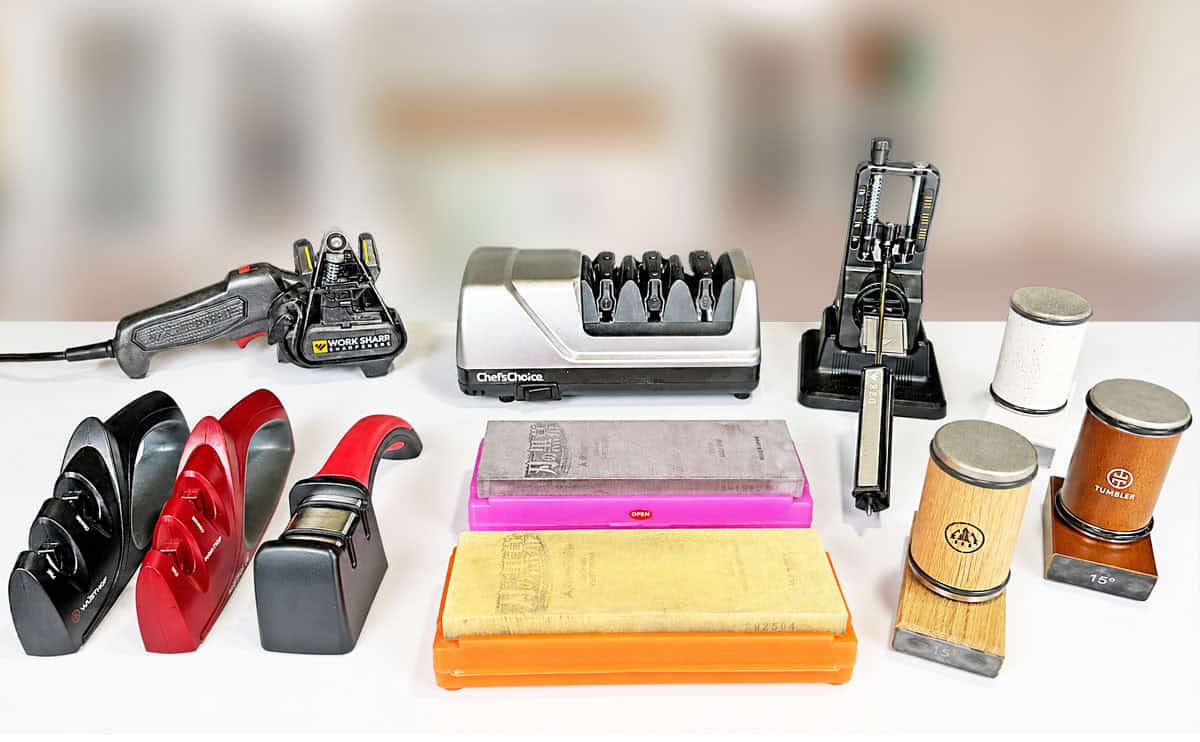
To find out which sharpener type works best for home cooks, I tested six types: manual pull-through, electric pull-through, rolling, electric belt, fixed-angle, and whetstone sharpeners. In this review, I’ll show you how each one performed, how easy each one was to use, and which types I’d buy or skip.
Key Takeaways
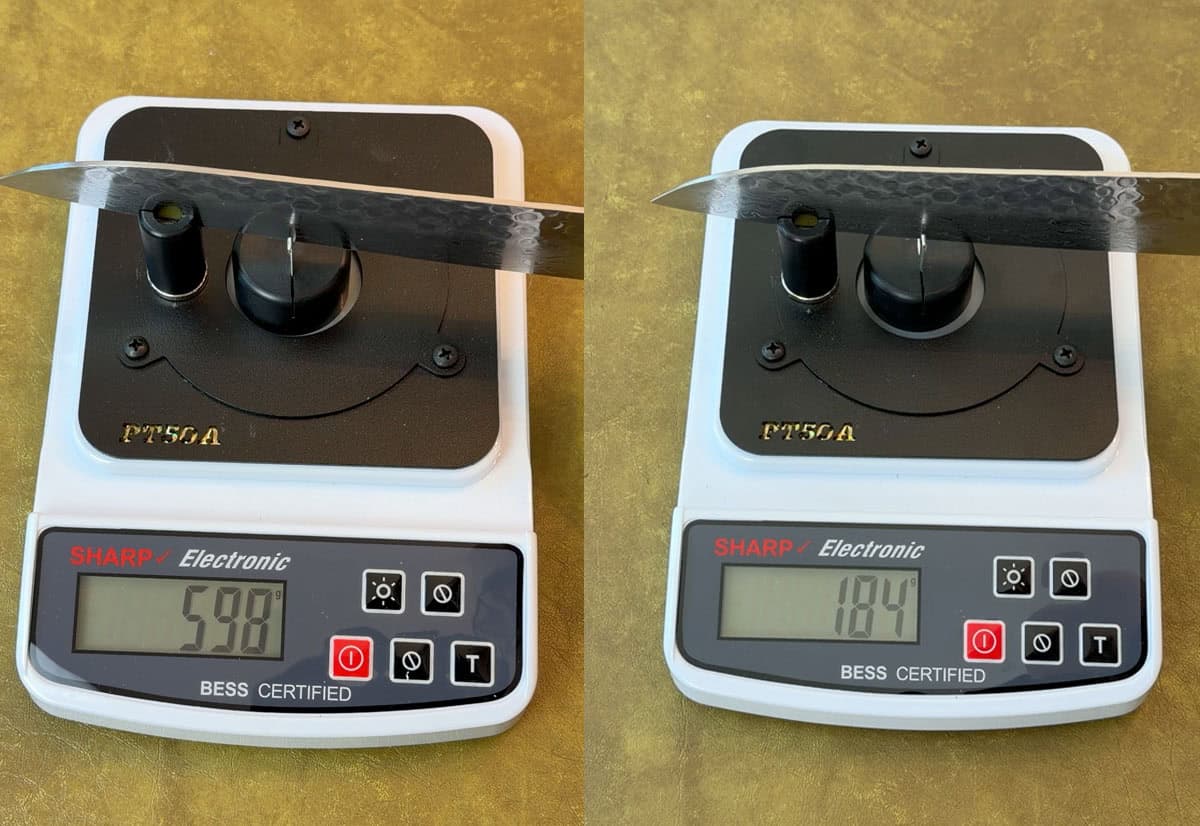
The best sharpener type for most home cooks is an electric pull-through sharpener. The Chef’sChoice 15XV was fast, easy to use, and produced some of the sharpest results in my testing. It took a cheap chef’s knife from 924 to 173 BESS, a harder Japanese-style knife from 598 to 184, and a Lamson forged knife down to 144 after a second sharpening.
The best sharpener type if you want the most control is a whetstone. The Shapton stones I tested took a cheap chef’s knife from 1035 to 211 BESS, a Zwilling Pro from 941 to 266, and a Cangshan Thomas Keller knife from 462 to 248. Whetstones work on almost any knife, but they take practice.
Rolling sharpeners are a good middle ground. They’re easier than whetstones, cleaner than electric belt sharpeners, and less aggressive than electric pull-through sharpeners. But they can take a long time on very dull knives, and the better ones are expensive.
Manual pull-through, fixed-angle, and electric belt sharpeners all have a place, but they wouldn’t be my first choice for most home cooks. Manual pull-through sharpeners are easy but less effective. Fixed-angle systems offer control but can be slow and awkward. Electric belt sharpeners can work well, but the metal dust makes them a poor fit for most kitchens.
You can check the latest price for the sharpeners I tested here:
Use the links below to navigate the review:
- Comparison Chart
- How I Tested
- Manual Pull-Through Sharpeners
- Electric Pull-Through Sharpeners
- Rolling Sharpeners
- Electric Belt Sharpeners
- Fixed-Angle Systems
- Whetstones
- Bottom Line: Which Knife Sharpener Type Is Best?
Comparison Chart
Swipe to view the entire chart on mobile.
| Sharpener Type | Model Tested | Best For | Time | Noise | Pros | Cons |
|---|---|---|---|---|---|---|
| Manual pull-through | Chef’sChoice Professional Manual Knife Sharpener | Beginners who want the cheapest and easiest option | About 1 minute | Low 70s dB | Small, simple, no setup | Least effective, limited control, can scratch knives |
| Electric pull-through | Chef’sChoice 15XV EdgeSelect Professional Electric Knife Sharpener | Home cooks who want sharp knives fast | About 2 minutes | Mid to high 80s dB | Fast, easy, excellent sharpness | Loud, less control, not ideal for every knife shape |
| Rolling | Horl 3 | People who want an easier alternative to whetstones | 3 to 6+ minutes | High 60s dB | Edge stays visible, clean, consistent angle support | Expensive, slower on dull knives, tip takes practice |
| Electric belt | Work Sharp MK2 Electric Knife Sharpener | Garage or workshop sharpening | A few minutes | 77 to low 80s dB | Strong results, fast, good for very dull knives | Messy, metal dust, belt changes, not ideal indoors |
| Fixed-angle | Work Sharp Precision Adjust | Knife enthusiasts who want angle control | About 5 minutes | Low 70s dB | Adjustable angle, visible edge | Slow, repetitive, clamp and base flexed |
| Whetstone | Shapton Ha No Kuromaku Ceramic Whetstones | Best long-term skill and most flexible sharpening | About 5 minutes | Mid 60s dB | Excellent results, works on almost any knife | Highest learning curve, messier, requires angle control |
How I Tested
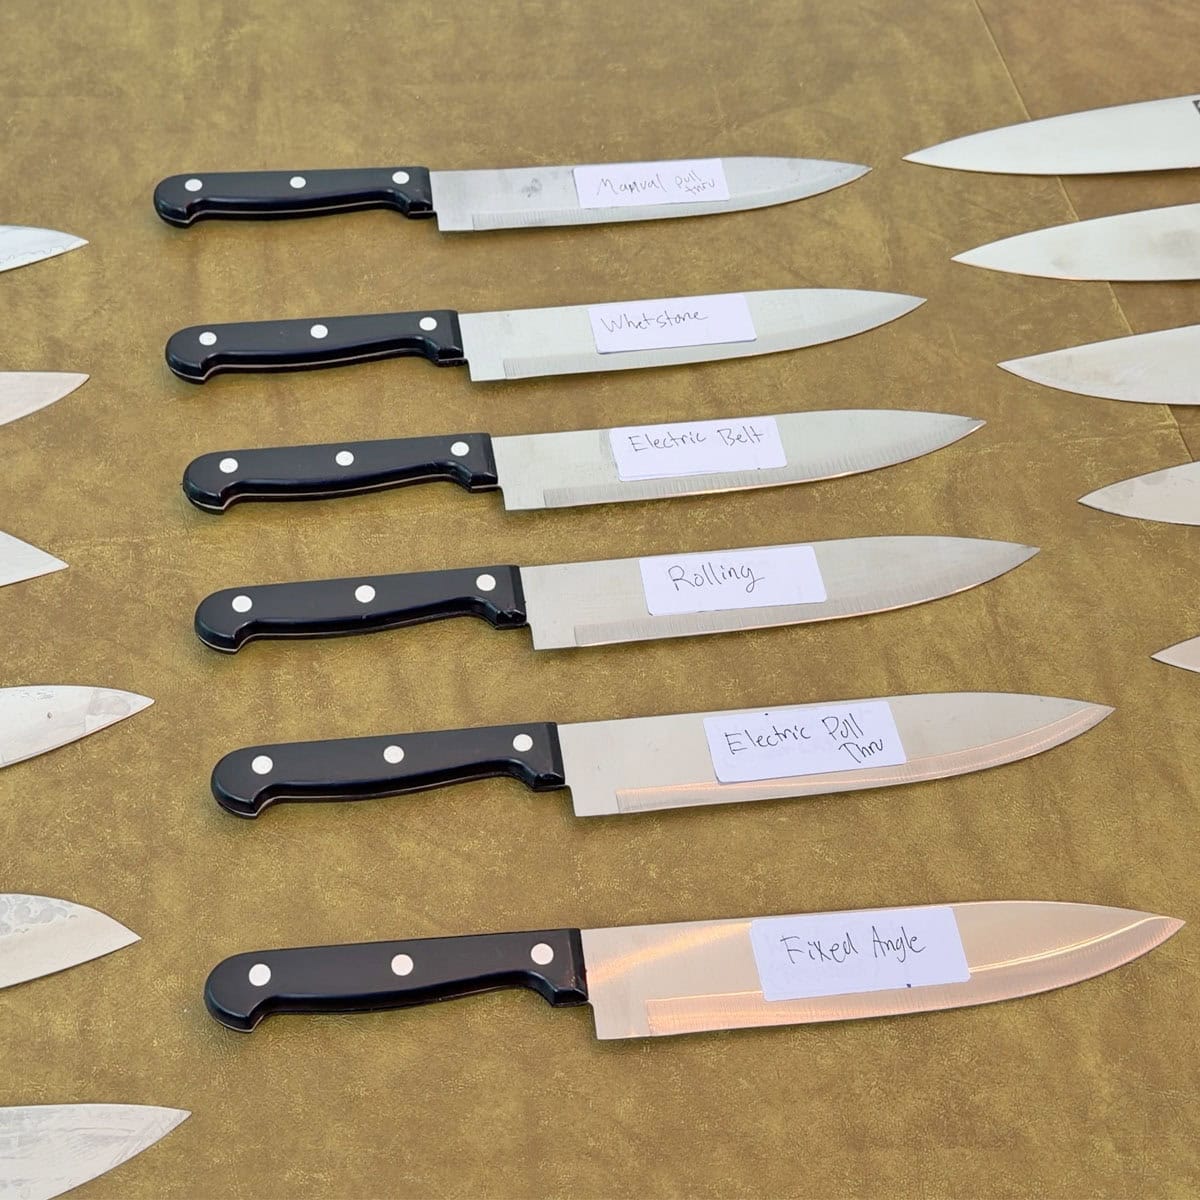
For each sharpener, I dulled three knives, measured their sharpness, sharpened them according to the manufacturer’s instructions, and measured their sharpness again.

I used a mix of cheap and higher-quality knives so each sharpener had to handle different blade types. The lineup included inexpensive Chef Craft chef’s knives, Western-style knives from Zwilling, Wusthof, and Lamson, and harder Japanese-style knives from Shun, Miyabi, Oishya, and Cangshan.
I also tracked how long each sharpener took, how loud it was, how much mess it made, how easy it was to set up, how easy it was to store, and what problems I ran into.
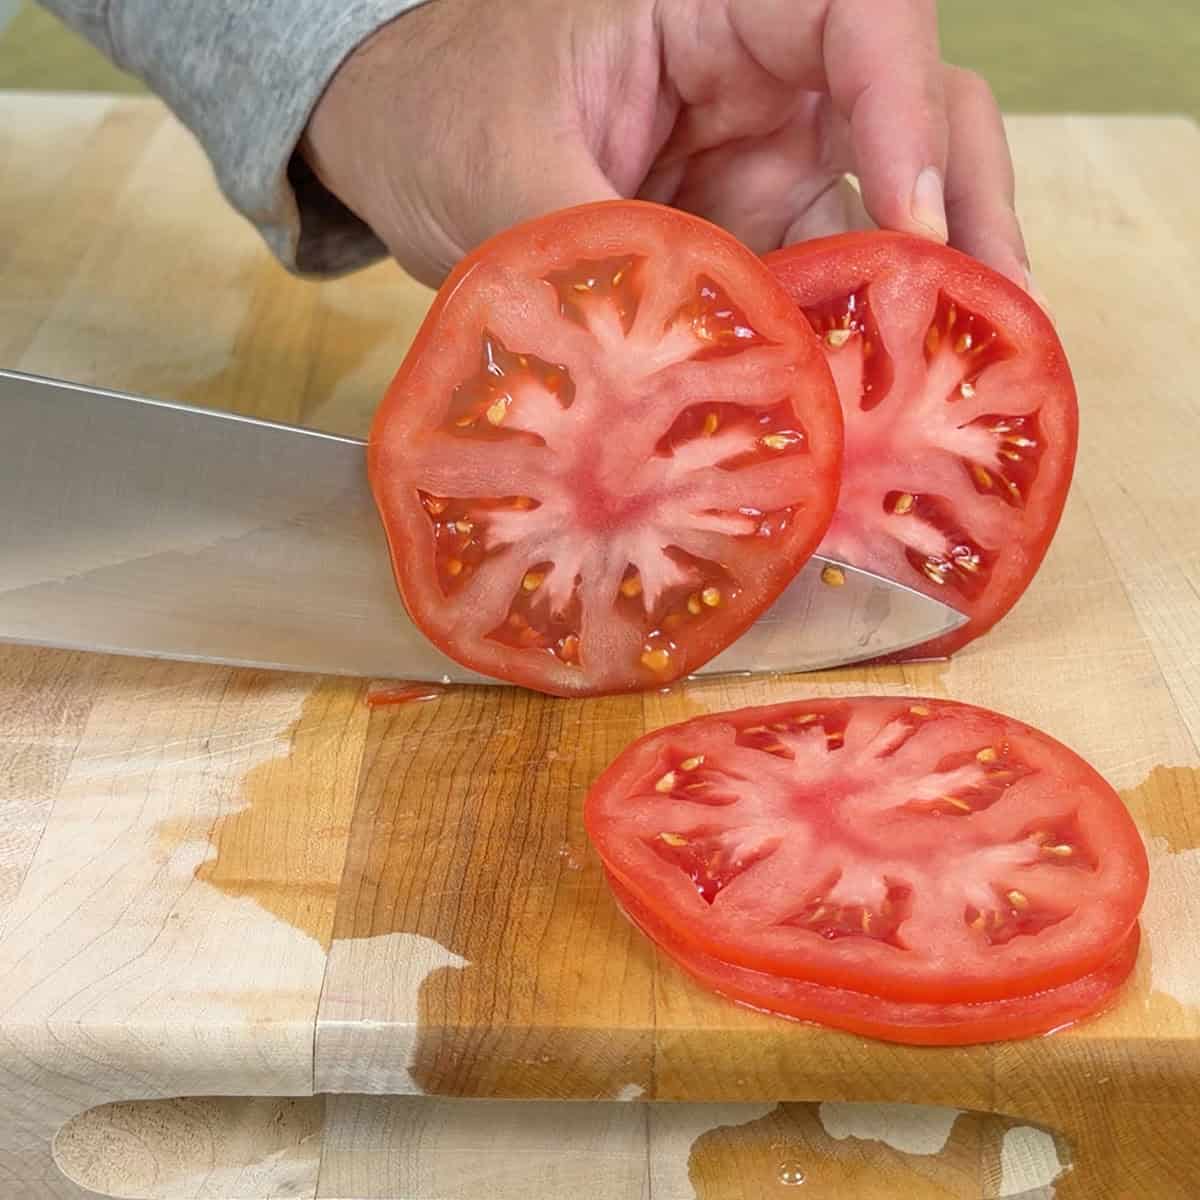
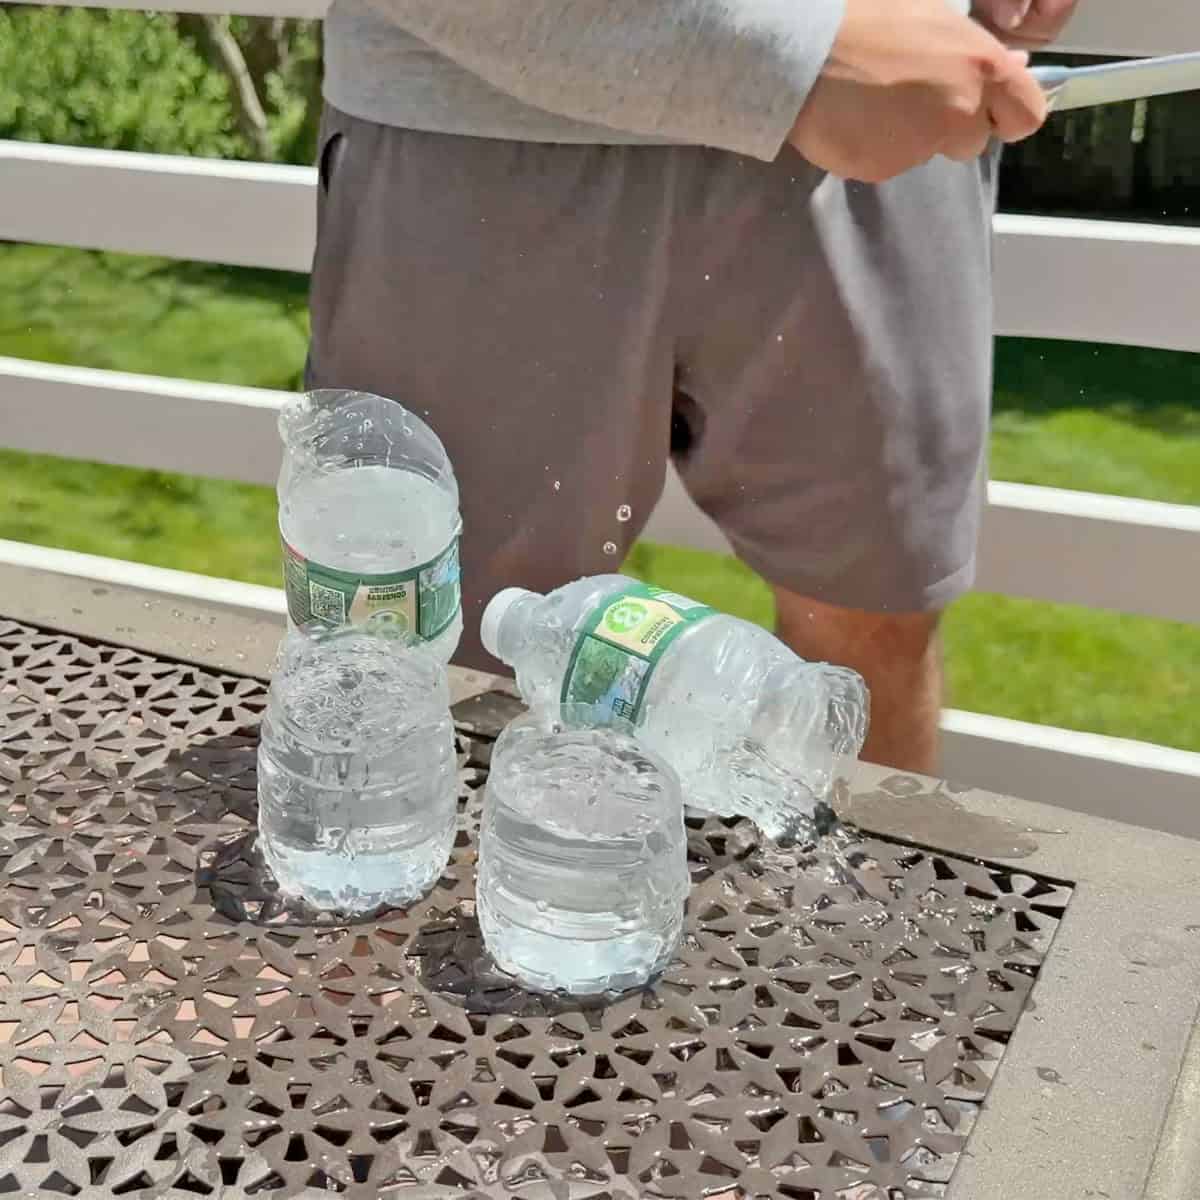
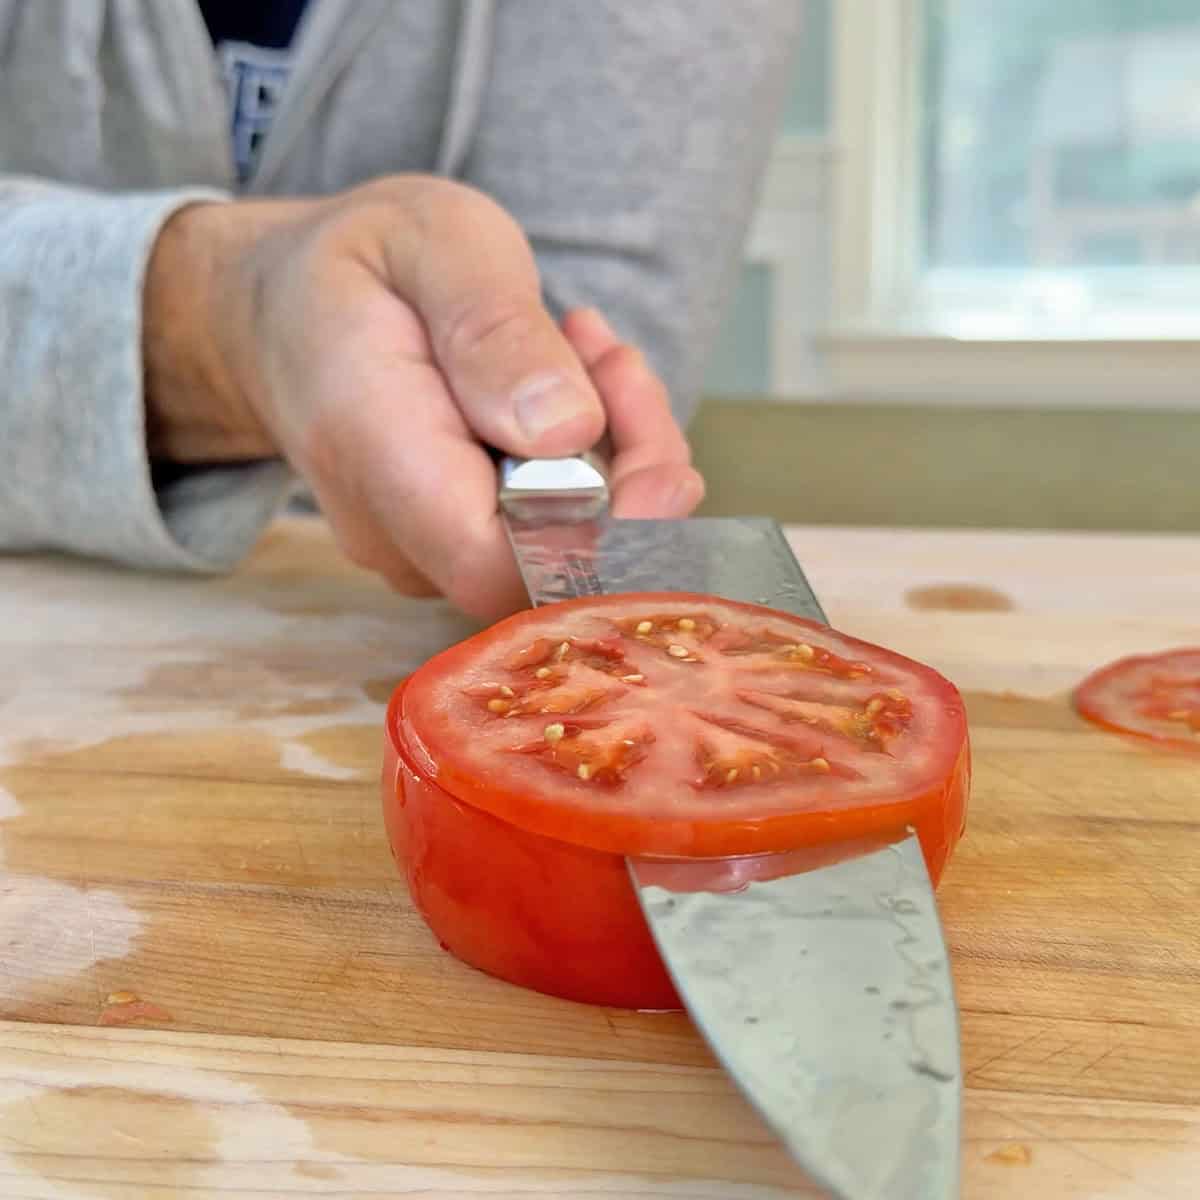
After sharpening, I tested each knife on paper, tomatoes, and peppers. In a few cases, I also used a plastic water bottle test to see how cleanly the edge could cut through a thin but flexible surface.
Manual Pull-Through Sharpeners
The most beginner-friendly option is a manual pull-through sharpener. You set it on the counter, put the knife in the slot, and pull it back and forth.
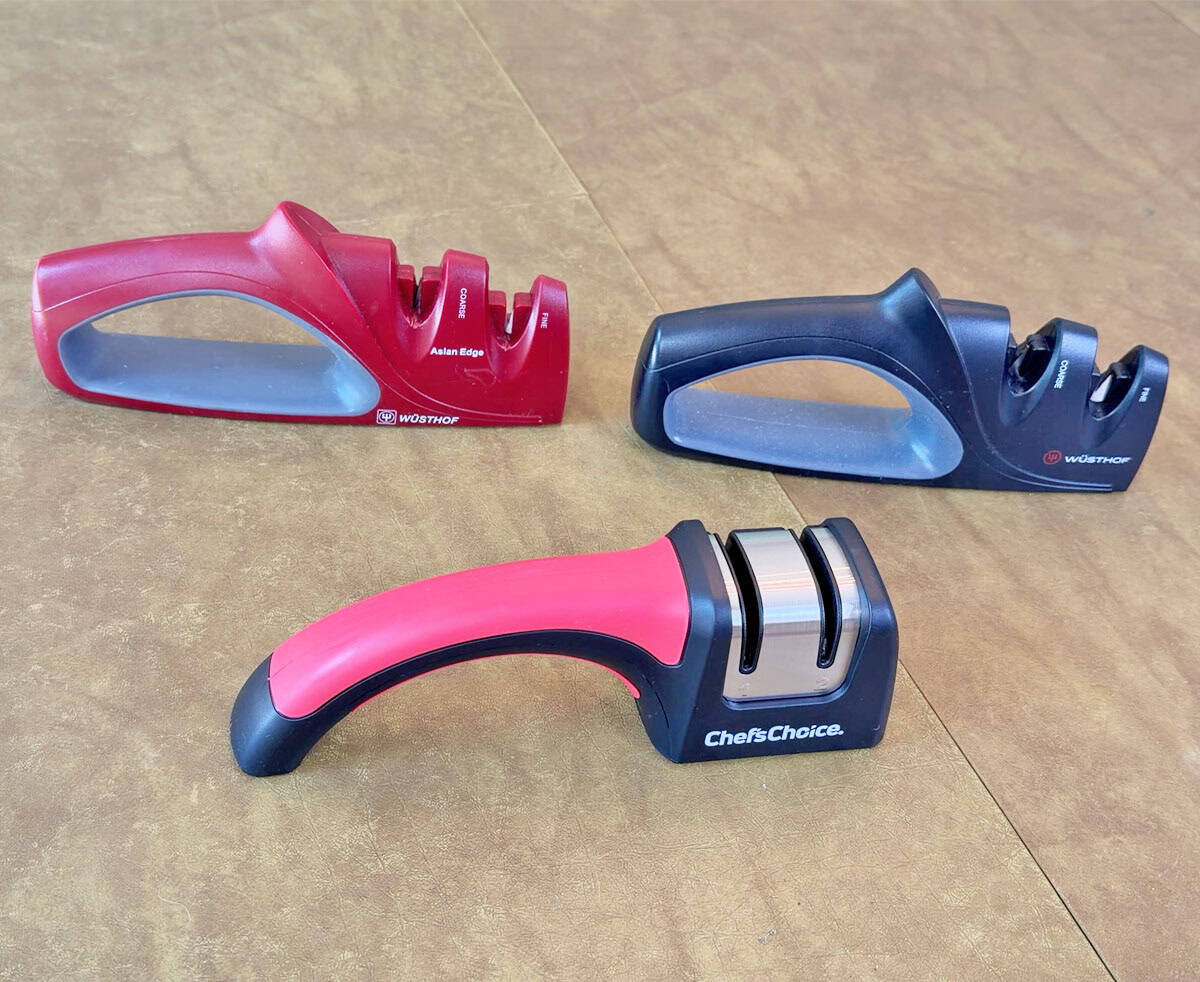
There’s no power, no setup, no angle to figure out, and it’s small enough to fit in a drawer.
Some manual pull-through sharpeners have a V-shaped slot with carbide or ceramic pieces that scrape against the edge. Others, like the Chef’sChoice model I tested, use small rotating diamond-coated wheels.
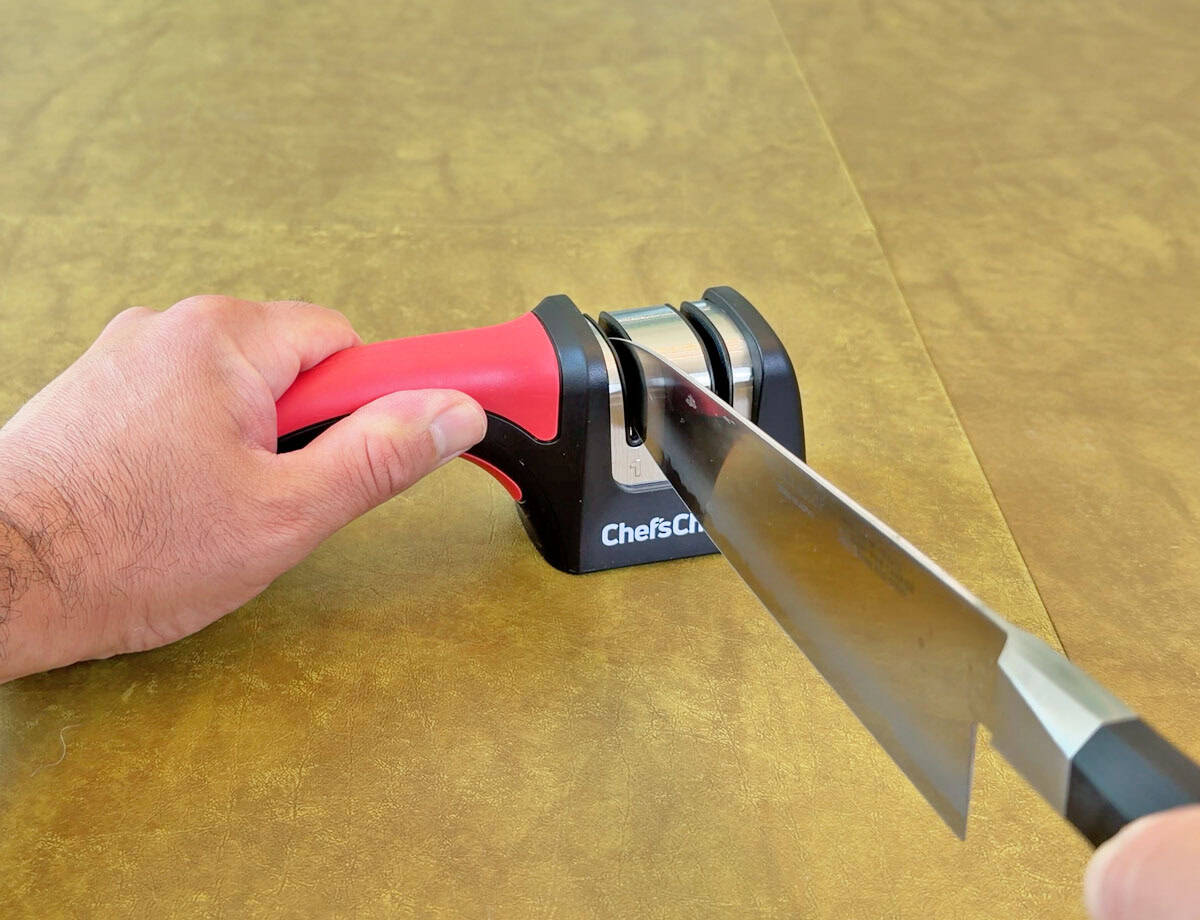
I prefer the rotating wheel style because it feels more controlled and less harsh than dragging a knife through a fixed V-shaped scraper.
The results were okay, but not great.
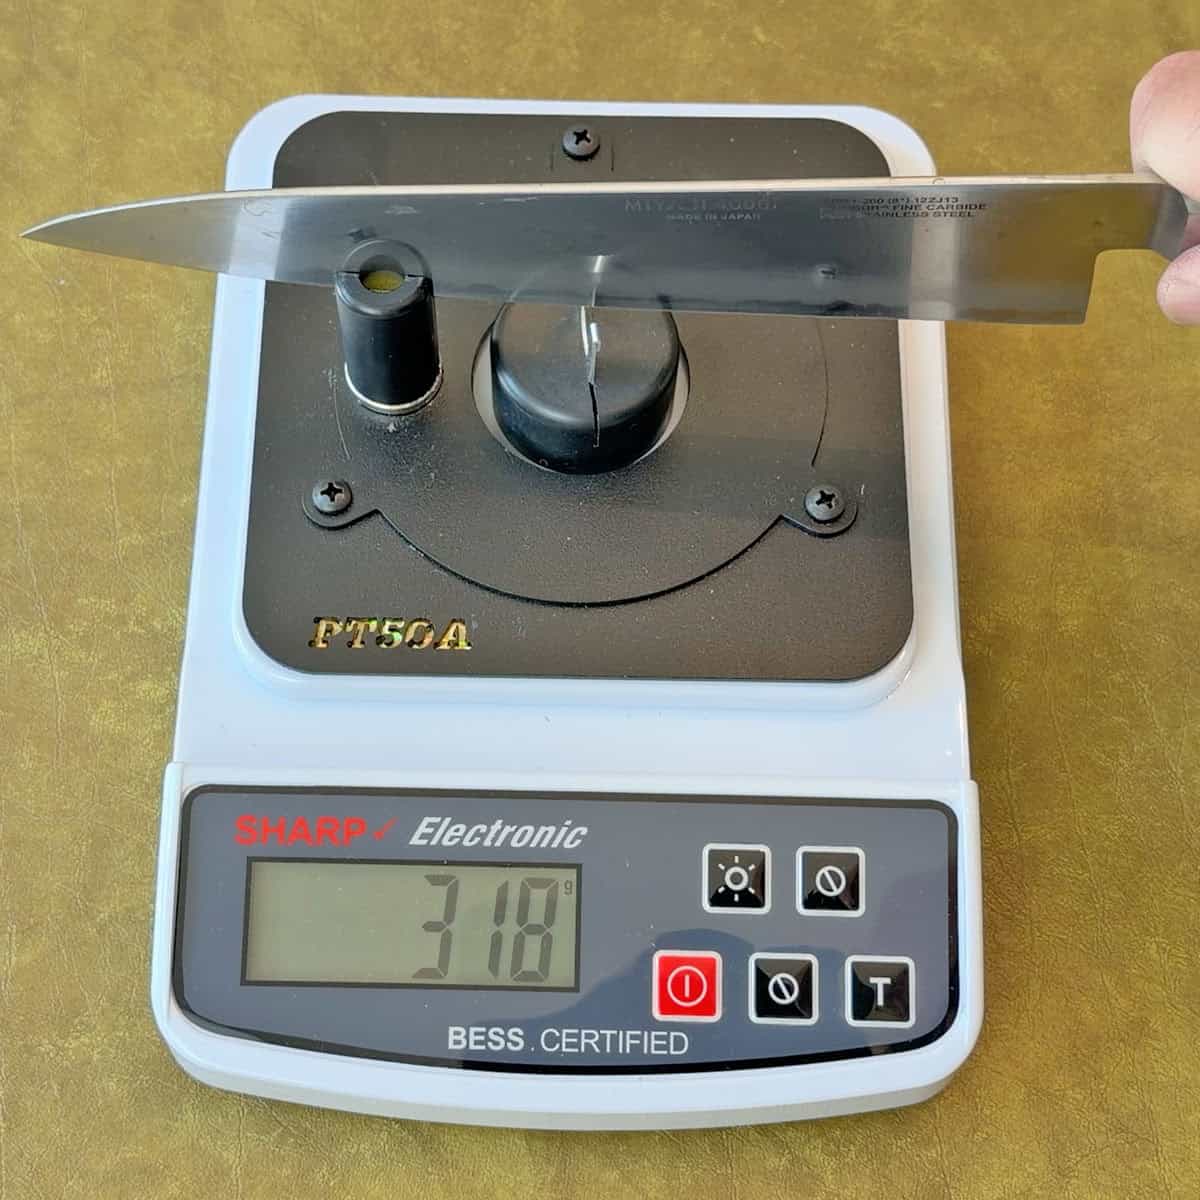
The cheap Chef Craft chef’s knife went from 708 to 415 BESS after the first sharpening. The Zwilling Pro S went from 753 to 439. The Miyabi Koh went from 700 to 318.
I sharpened each knife a second time. The cheap knife barely changed, finishing at 410. The Zwilling improved to 393. The Miyabi actually got worse, moving from 318 to 372.
That tells me this type of sharpener can improve an edge, but it’s not consistent. It helped the knives, but none of the final scores landed in the range I’d call very sharp.
The cutting tests matched the BESS scores. The cheap knife failed the paper test and struggled with the tomato. The Zwilling passed both. The Miyabi almost passed the paper test but ripped near the end.
The biggest benefit is convenience. This is the easiest type to use and store.
The biggest downside is limited control. Most manual pull-through sharpeners don’t let you adjust the angle, and if you press down too hard, they can remove more metal than necessary. I also noticed scratches on the side of one knife after sharpening.
I’d only use this type if you want something cheap and simple for basic maintenance. I wouldn’t rely on it for expensive knives or knives that are very dull.
Electric Pull-Through Sharpeners
Electric pull-through sharpeners work a lot like manual pull-through sharpeners, but the abrasive wheels are motorized.
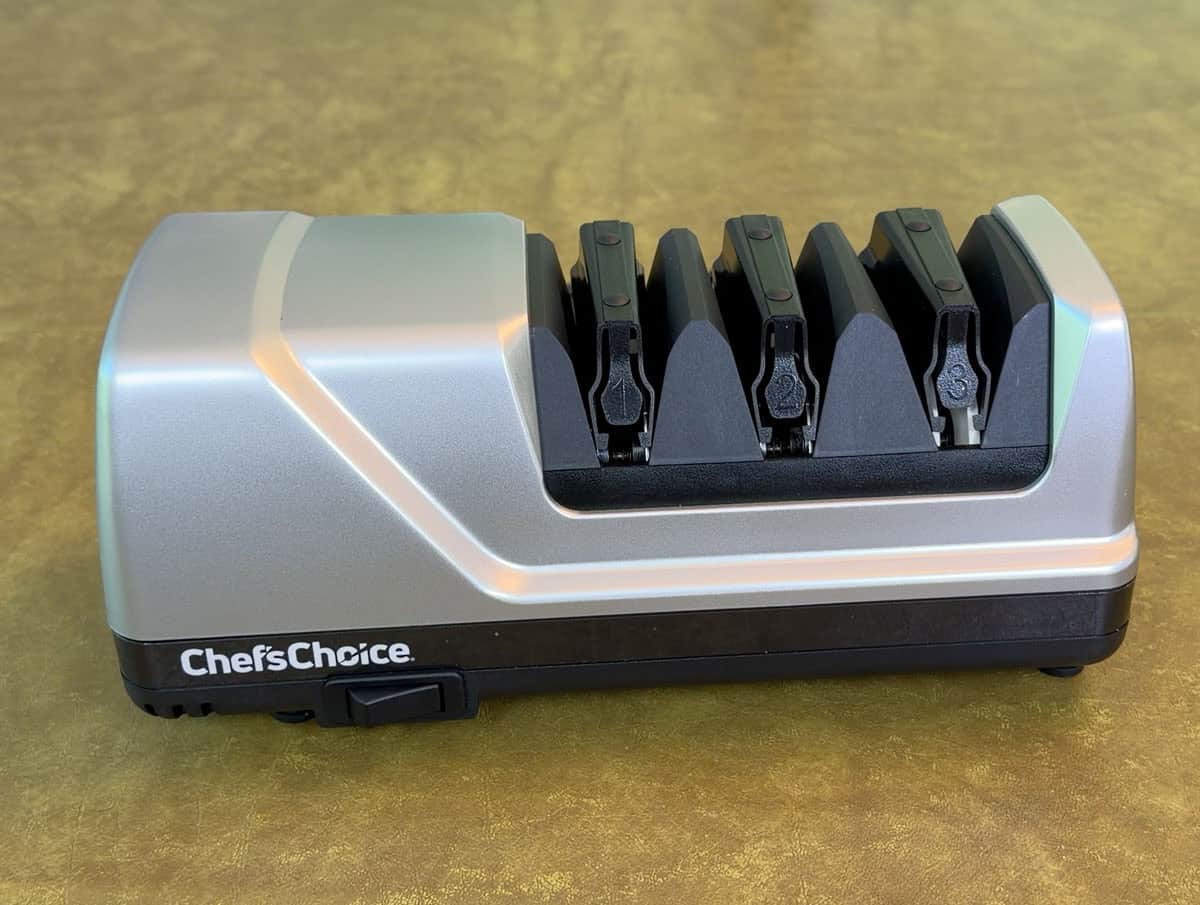
You pull the knife through each slot, the wheels grind and refine the edge, and the angle guides help keep the knife in the right position.
The main benefit is speed. There’s almost no setup, you don’t need to hold an angle yourself, and the machine does most of the work.
In my testing, the Chef’sChoice 15XV was much more effective than the manual pull-through sharpener.
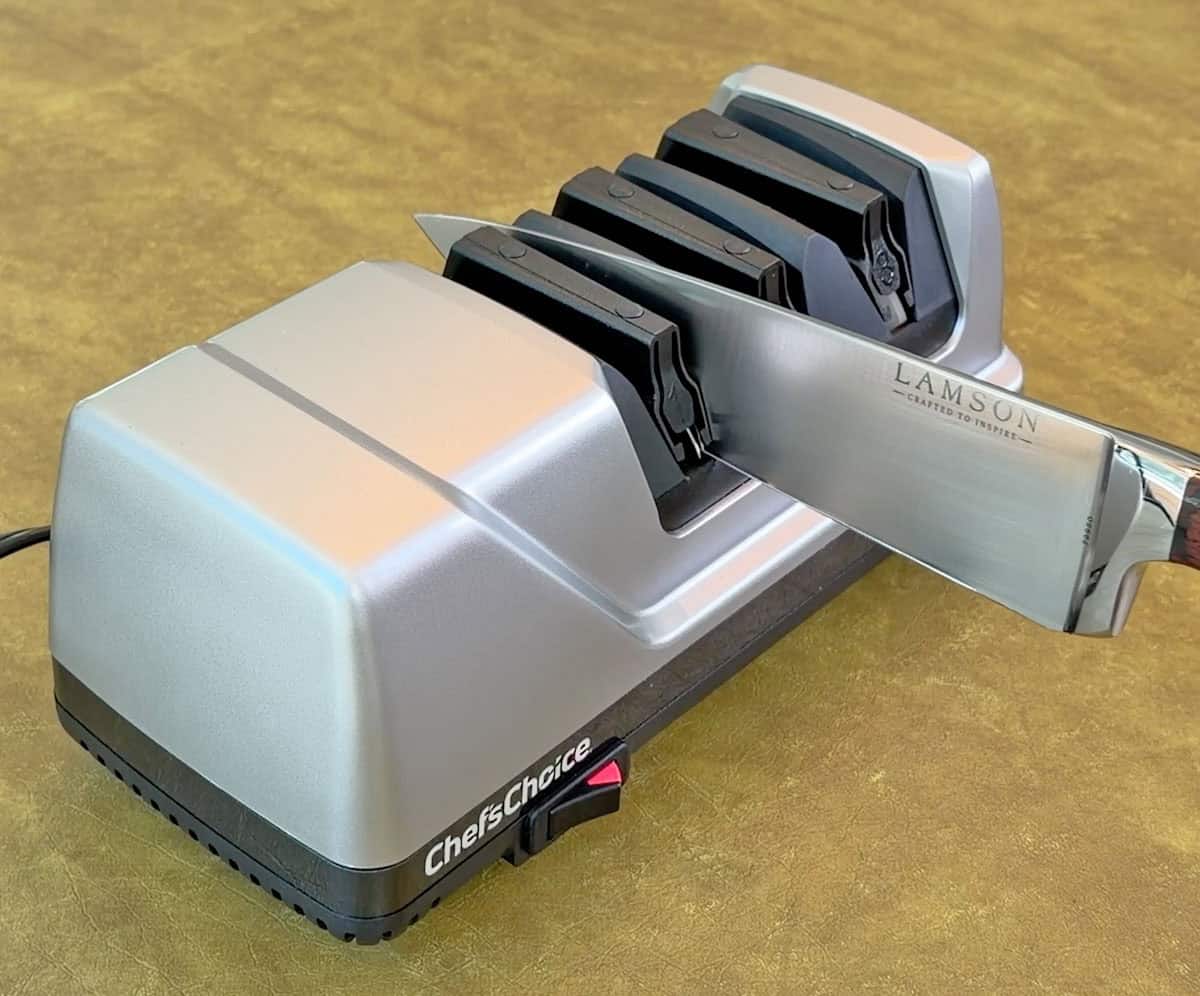
The cheap Chef Craft knife went from 924 to 173 BESS in about two minutes. The Oishya KYU went from 598 to 184. The Lamson Premier Forged knife was strange at first. It measured 630 and 709 after the first sharpening, but after I ran it through again, it finished at 144 and 125 in two separate readings.
Those were some of the best results in the entire test.
The knives felt noticeably sharper in the cutting tests, too. All three passed the paper test, sliced tomatoes cleanly, and cut peppers with a crisp edge.
The Lamson was the standout. After the second sharpening, it was sharp enough to slice through one plastic water bottle without knocking it over. Then it cut through two water bottles side by side.
That said, electric pull-through sharpeners have real downsides.
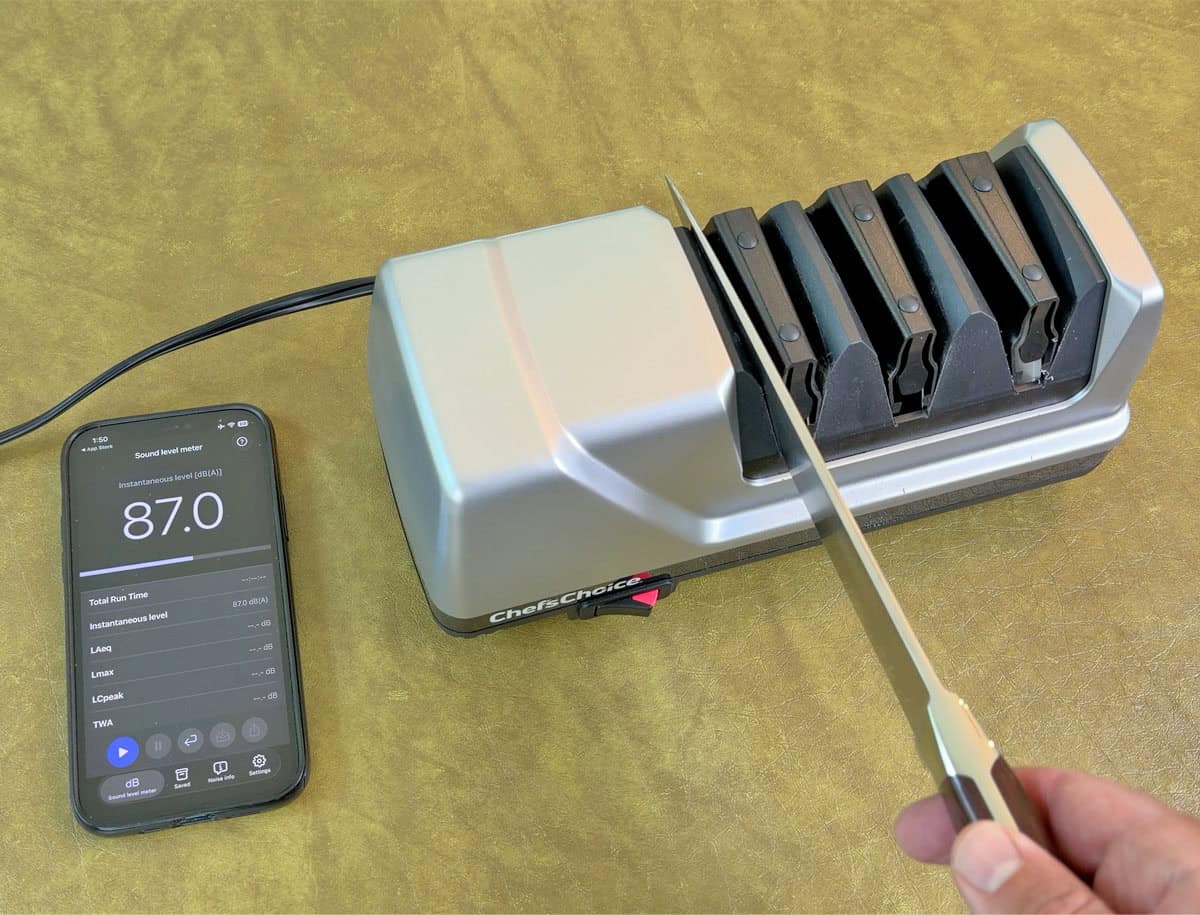
The first is noise. The Chef’sChoice 15XV measured in the mid to high 80-decibel range during my noise test. It sounds more like a small power tool than a kitchen gadget.
The second issue is control. The angle guides help, but the edge is hidden inside the slot. You can’t see what’s happening while the abrasive wheels are touching the blade.
That means you’re relying on sound and feel to know whether the knife is making proper contact. If you press too hard, pull unevenly, or sharpen more than needed, you can remove more metal than you meant to.
Knife shape matters, too. If your knife has a thick bolster, a thick choil, or a handle that sits close to the edge, the very back of the blade may not reach the sharpening wheels. That can leave part of the edge near the heel untouched.
There’s also more that can go wrong over time. An electric pull-through sharpener has a motor, spinning discs, angle guides, and abrasive surfaces that can wear down or get clogged with metal dust.
Even with those downsides, this is the sharpener type I’d recommend to most home cooks. If you want sharp knives fast and don’t want to learn freehand sharpening, it makes the most sense.
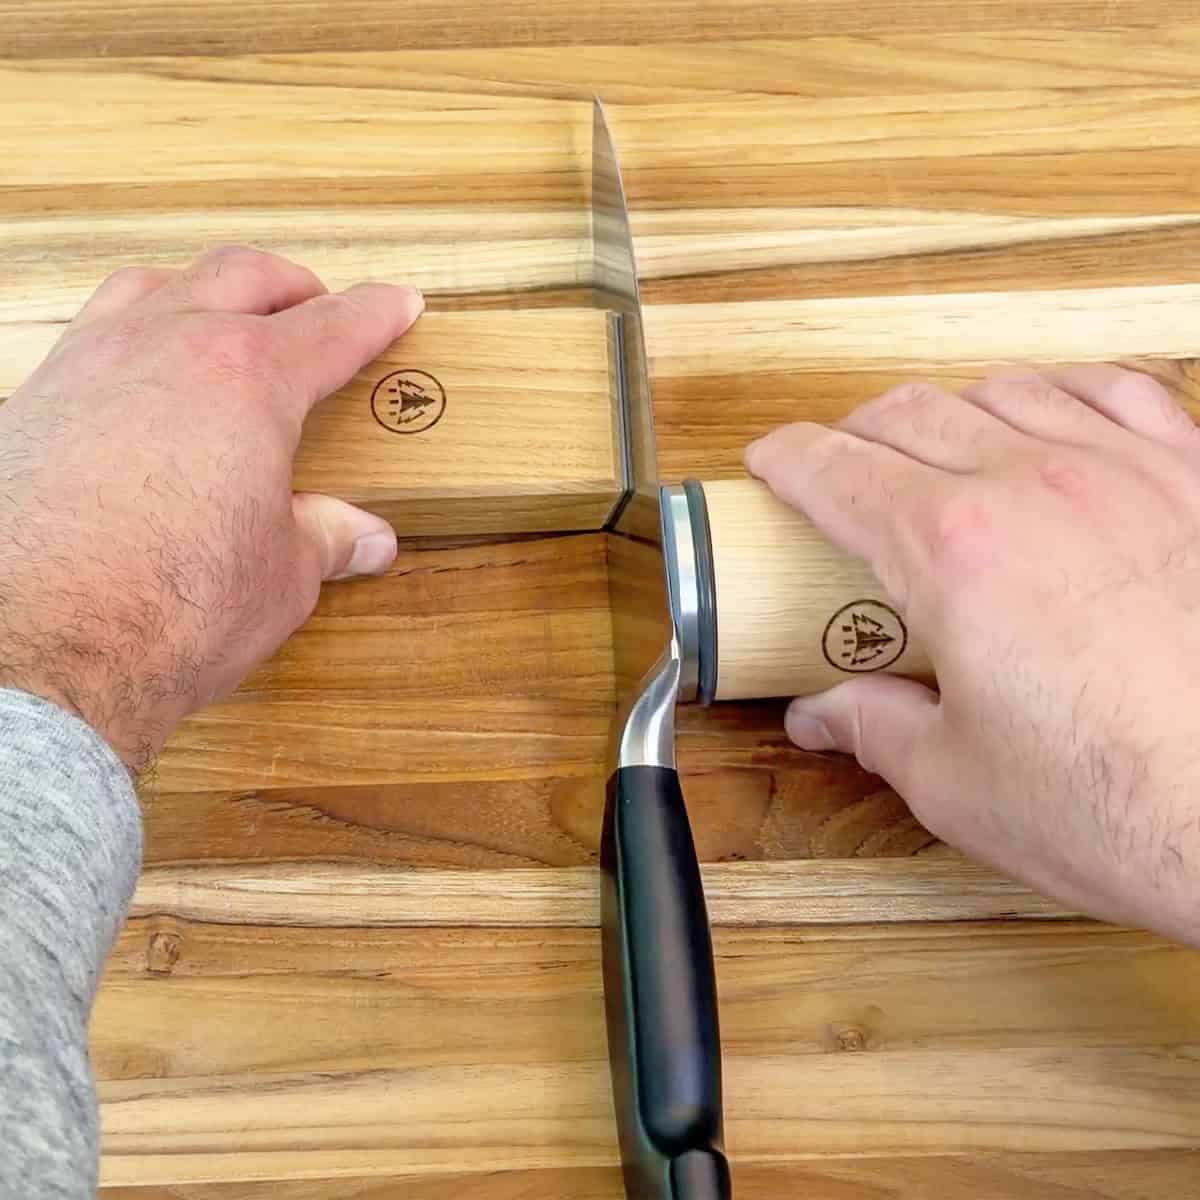
Rolling Sharpeners
Rolling sharpeners have become extremely popular over the last few years, and they’re simple to use.

You attach the knife to a magnetic angle support with the edge facing up, then roll the sharpener back and forth along the edge.
Depending on the knife, you may need to position the blade higher on the magnet or raise the roller on a thicker cutting board so the disc can reach the edge.
The main benefits are visibility and consistency. The magnetic block holds the knife at a consistent angle, the edge stays visible, and switching from the coarse sharpening side to the finer finishing side takes about one second.
I tested the Horl 3 for this comparison, and I’ve tested several other rolling sharpeners in the past, including Tumbler and Work Sharp. Quality varies a lot.

Some roll smoothly. Some feel stiff. Some have stronger magnets. Some give you more control than others.
The Horl 3 results were mixed.
The cheap Chef Craft knife barely improved after 6 minutes and 13 seconds. It went from 535 to 508 BESS and failed the paper test.
The Zwilling Four Star did better. It started at 651 and improved to 305 after 3 minutes and 52 seconds. After more sharpening, it measured 348, which was worse than the first result, but still much sharper than where it started.
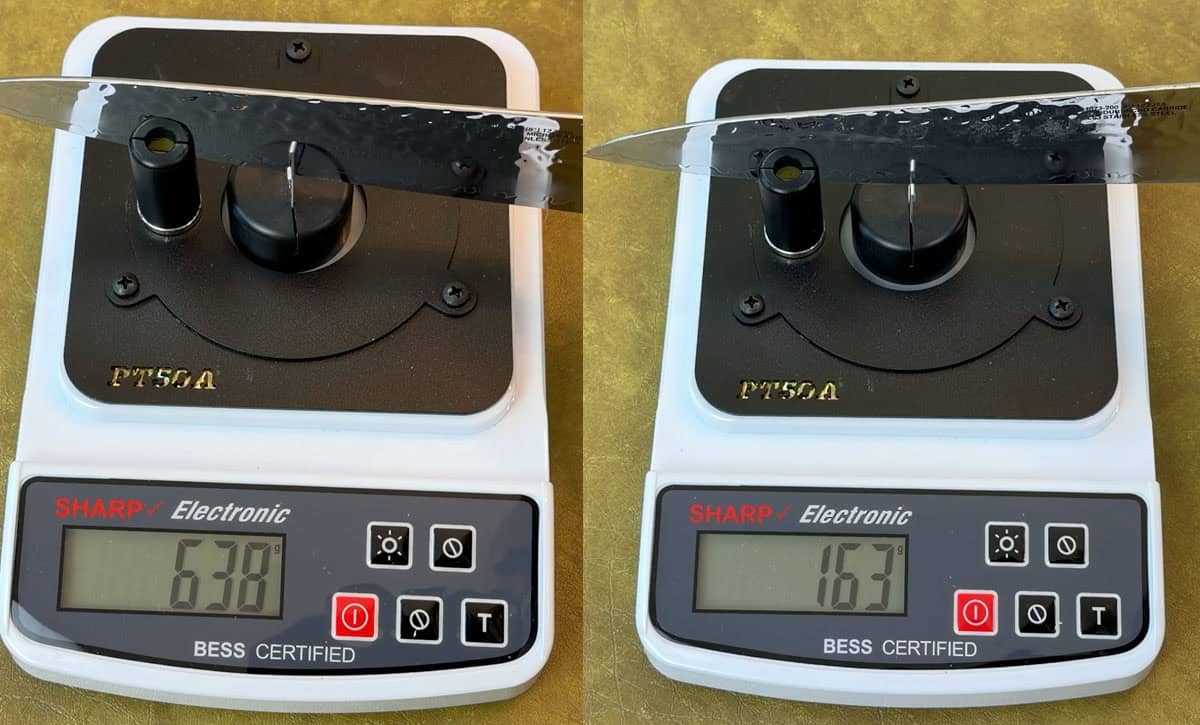
The Miyabi Artisan performed best. It started at 638 and measured 163 and 208 after about 6 minutes of sharpening. That’s an excellent result, especially considering the Miyabi has harder steel at 63 HRC.
HRC stands for Rockwell C hardness. It’s a scale for measuring how hard knife steel is. Harder knives can hold an edge well, but they can also be more demanding to sharpen.
If a knife is very dull, damaged, or you’re changing the edge angle, the first sharpening with a rolling sharpener can take a while. But if you’re patient, a good rolling sharpener can create a sharp edge.
Just for the challenge, I also tried sharpening a butter knife with a rolling sharpener. I’ve seen rolling sharpener brands do this in viral videos, so I wanted to see what would happen.
After 15 minutes per side, it went from extremely dull to under 400 BESS. That’s still not as sharp as a chef’s knife, but it proved that rolling sharpeners can create a new edge. It just takes time.
Although rolling sharpeners are easy to use, there are some annoying parts.
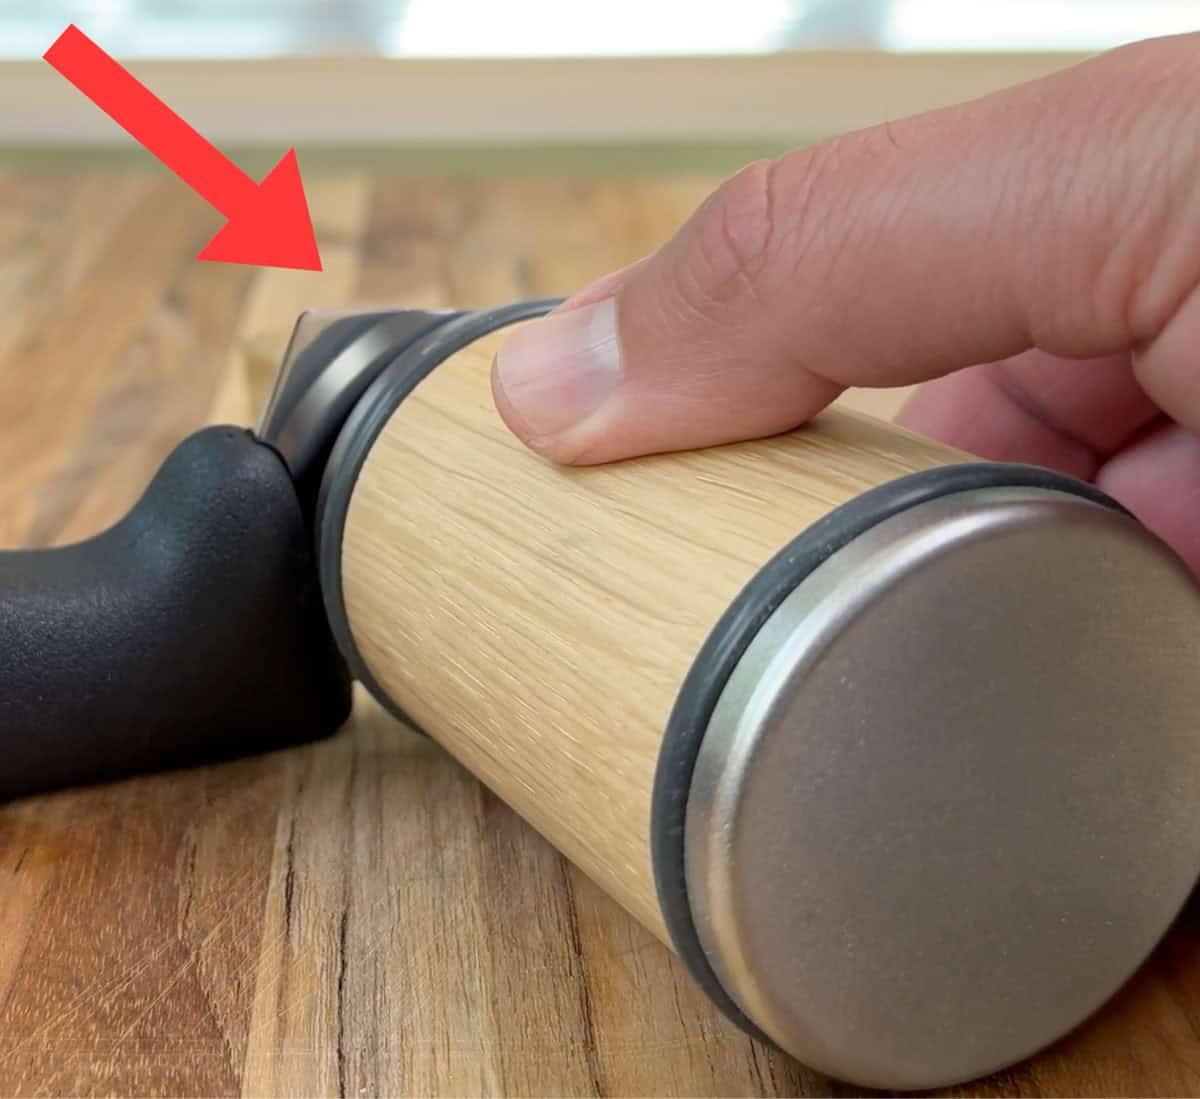
Near the tip, chef’s knives get thinner and start to curve. You have to lighten your pressure and turn the roller with the blade. If you just roll straight, the tip can flex away from the disc and sharpen unevenly.
Some handles can also block the roller from reaching the very back of the edge.
And because the edge faces up while you sharpen, you need to be careful that your hand doesn’t slip.
I like rolling sharpeners as a middle ground. They’re cleaner and safer for indoor use than belt sharpeners, easier to learn than whetstones, and less aggressive than electric pull-through sharpeners. But they’re not the fastest option, especially on very dull knives.
Electric Belt Sharpeners
Electric belt sharpeners come in many forms, but the Work Sharp MK2 is one of the most popular.
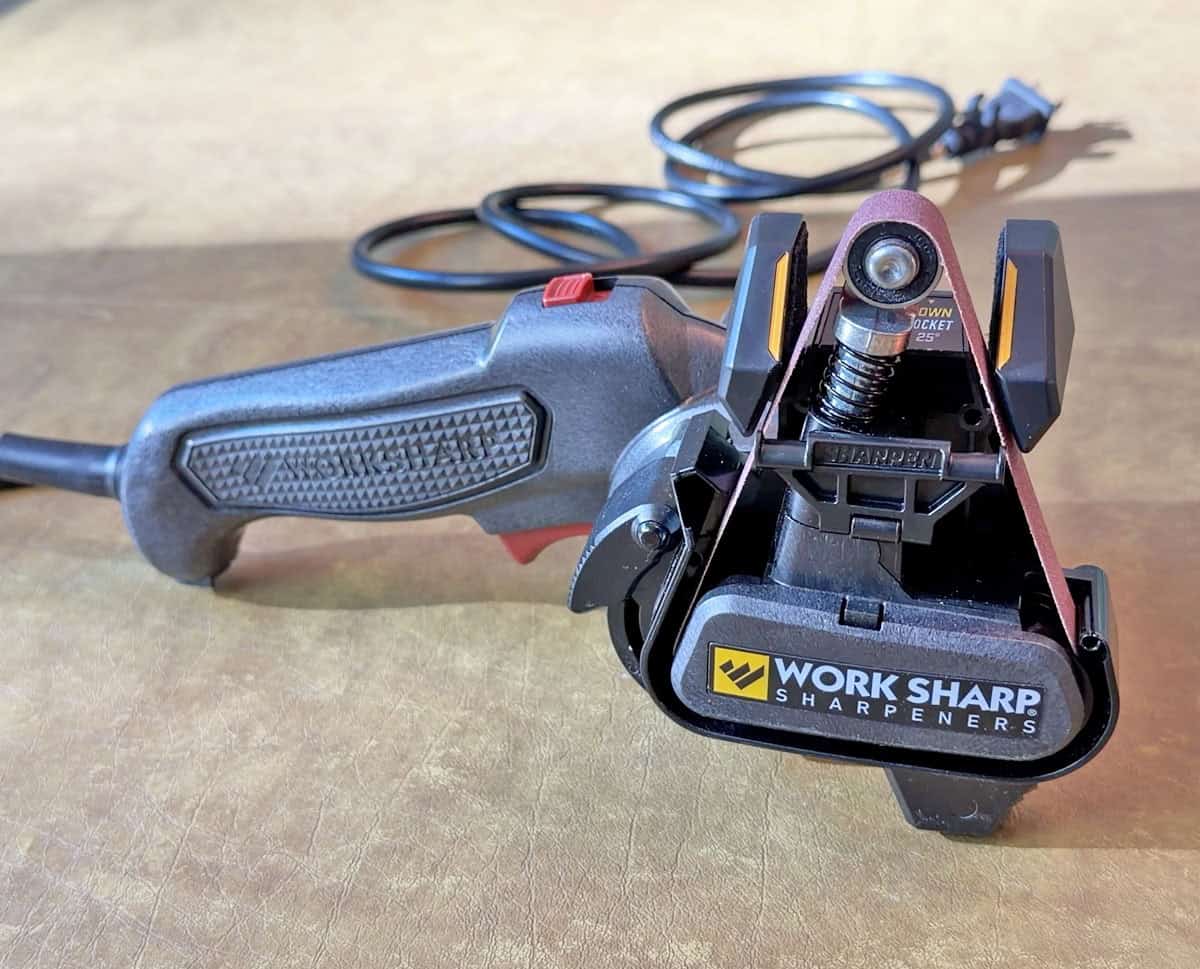
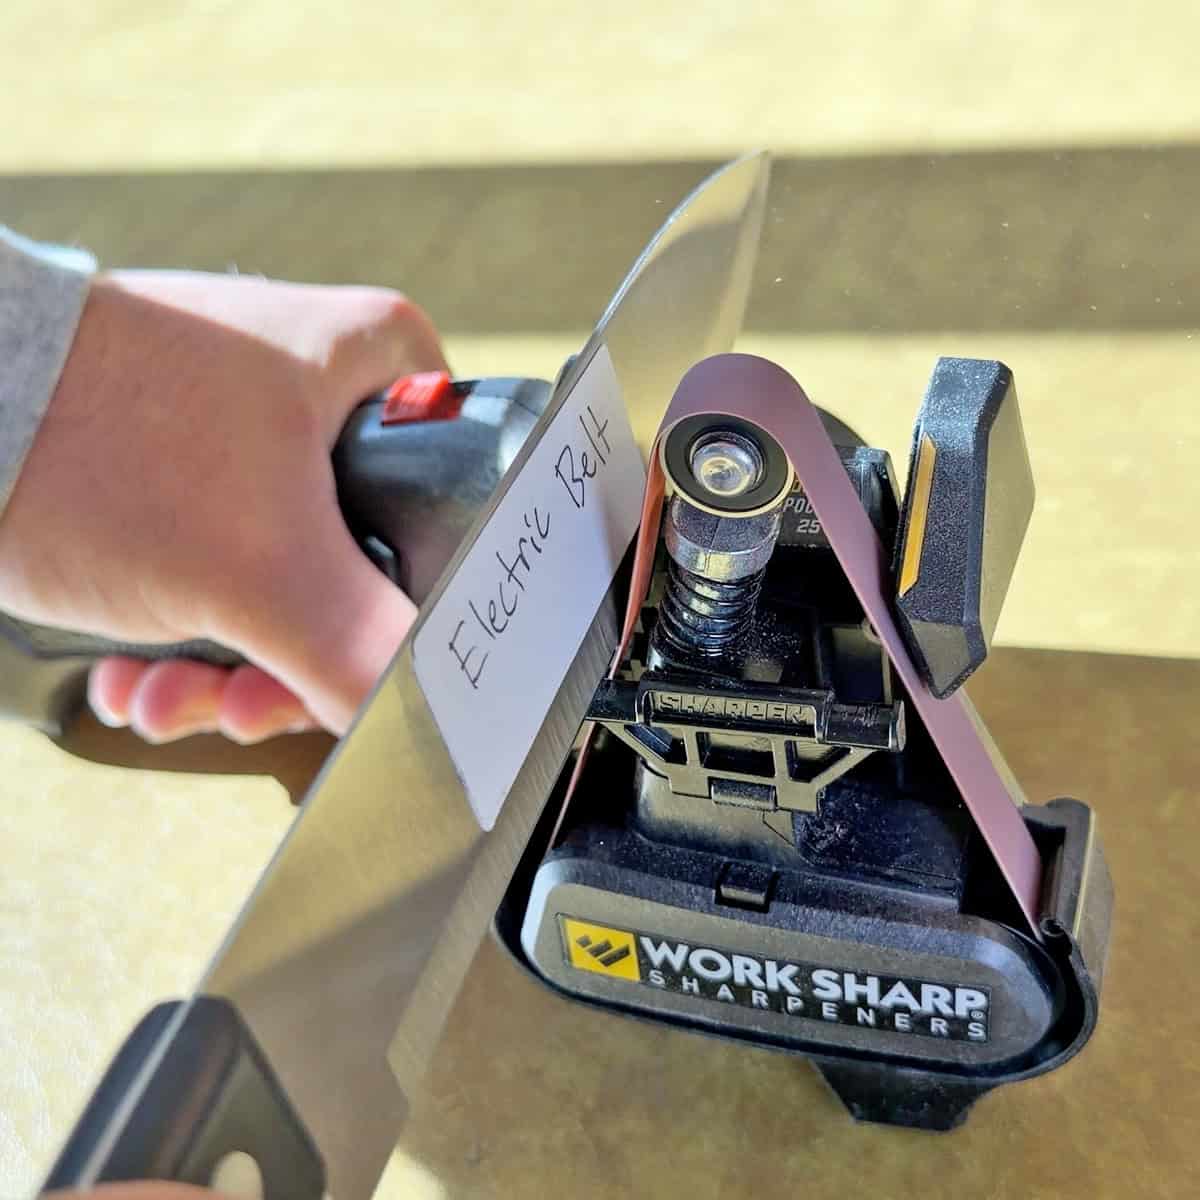
Unlike an electric pull-through sharpener, which uses spinning wheels inside fixed slots, this type uses a small moving abrasive belt. You hold the knife against the angle guide and pull the blade across the belt.
The Work Sharp MK2 has two angle settings, 20 and 25 degrees, and three belts with different levels of abrasiveness.
I like that you can place the heel of the knife on the belt before pressing the power button. With the electric pull-through sharpener, the wheels are already spinning when the knife enters the slot. With the Work Sharp MK2, you can line everything up first, then start sharpening.
In my testing, it did a good job overall.
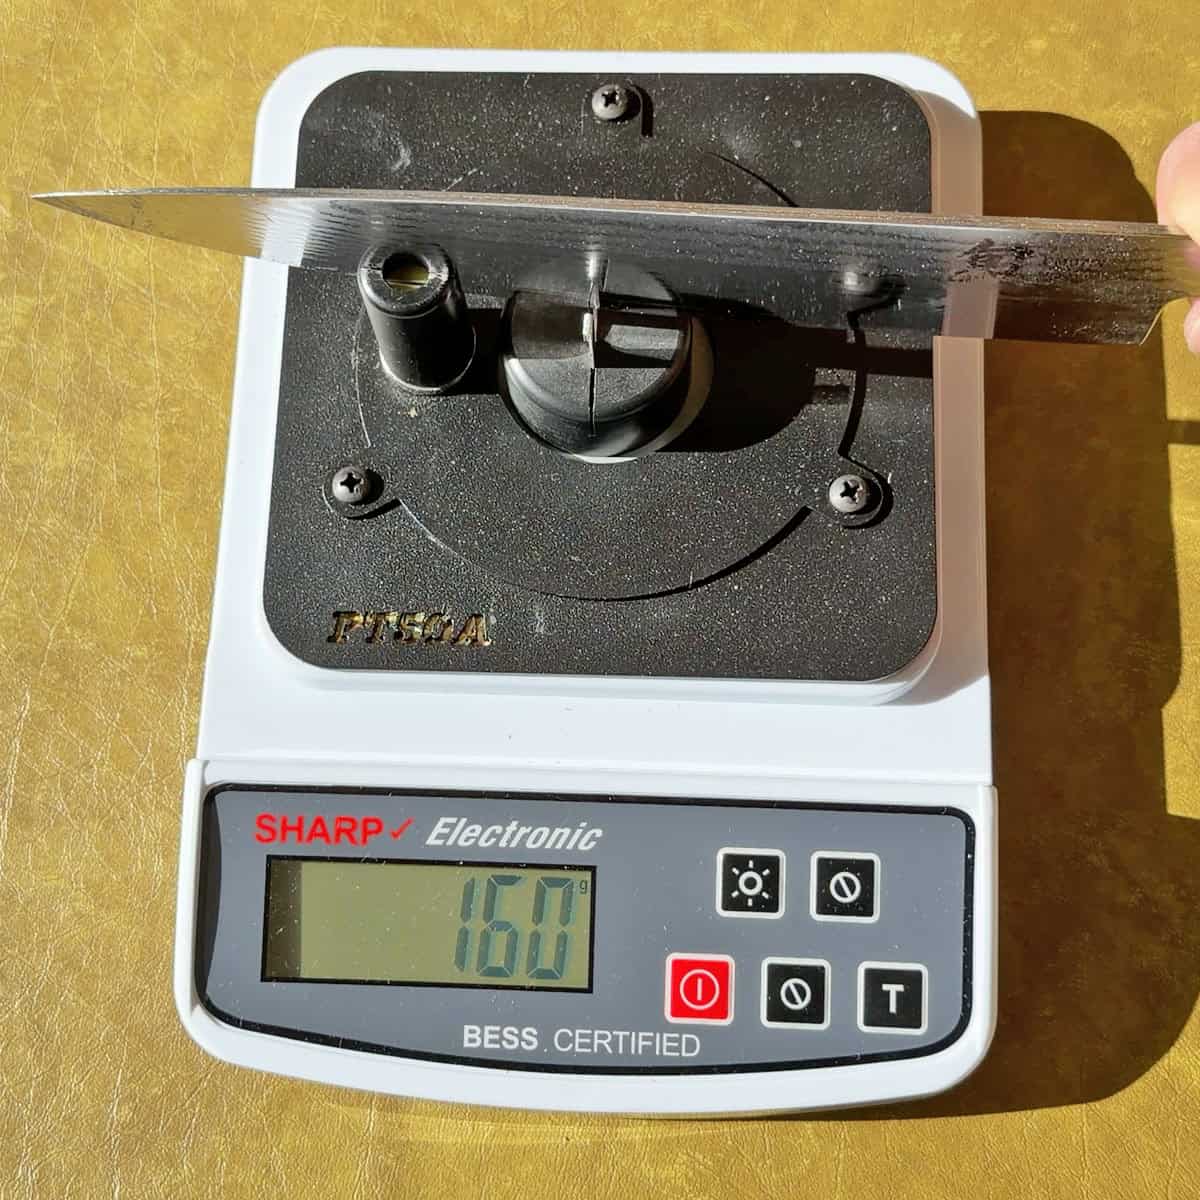
The cheap Chef Craft knife improved from 489 to 229 BESS. The Shun Classic went from 543 to 160, which was one of the best results across the entire test.
The Wusthof Classic Ikon started extremely dull at 1007 BESS. After the first round, it improved a lot but still needed more work. After a second sharpening, it got down to 219, which is great.
The sharpness results were strong, but this sharpener has several drawbacks.
It’s loud. It measured 77 decibels while running and reached the low 80s while sharpening with the coarse belt.
It only has two angle settings, so you don’t get the same angle control as a whetstone or fixed-angle system. It’s also designed more naturally for right-handed use.
Changing belts can be annoying, especially the fine-grit belt because it’s more flexible.

The bigger issue is the mess. As you sharpen, fine metal dust flies into the air and gets all over the sharpener and table.
That’s not something I want to breathe in or spread around my kitchen. This feels more like a tool I’d use in a garage, basement, or workshop. It’s not something I’d keep on the kitchen counter.
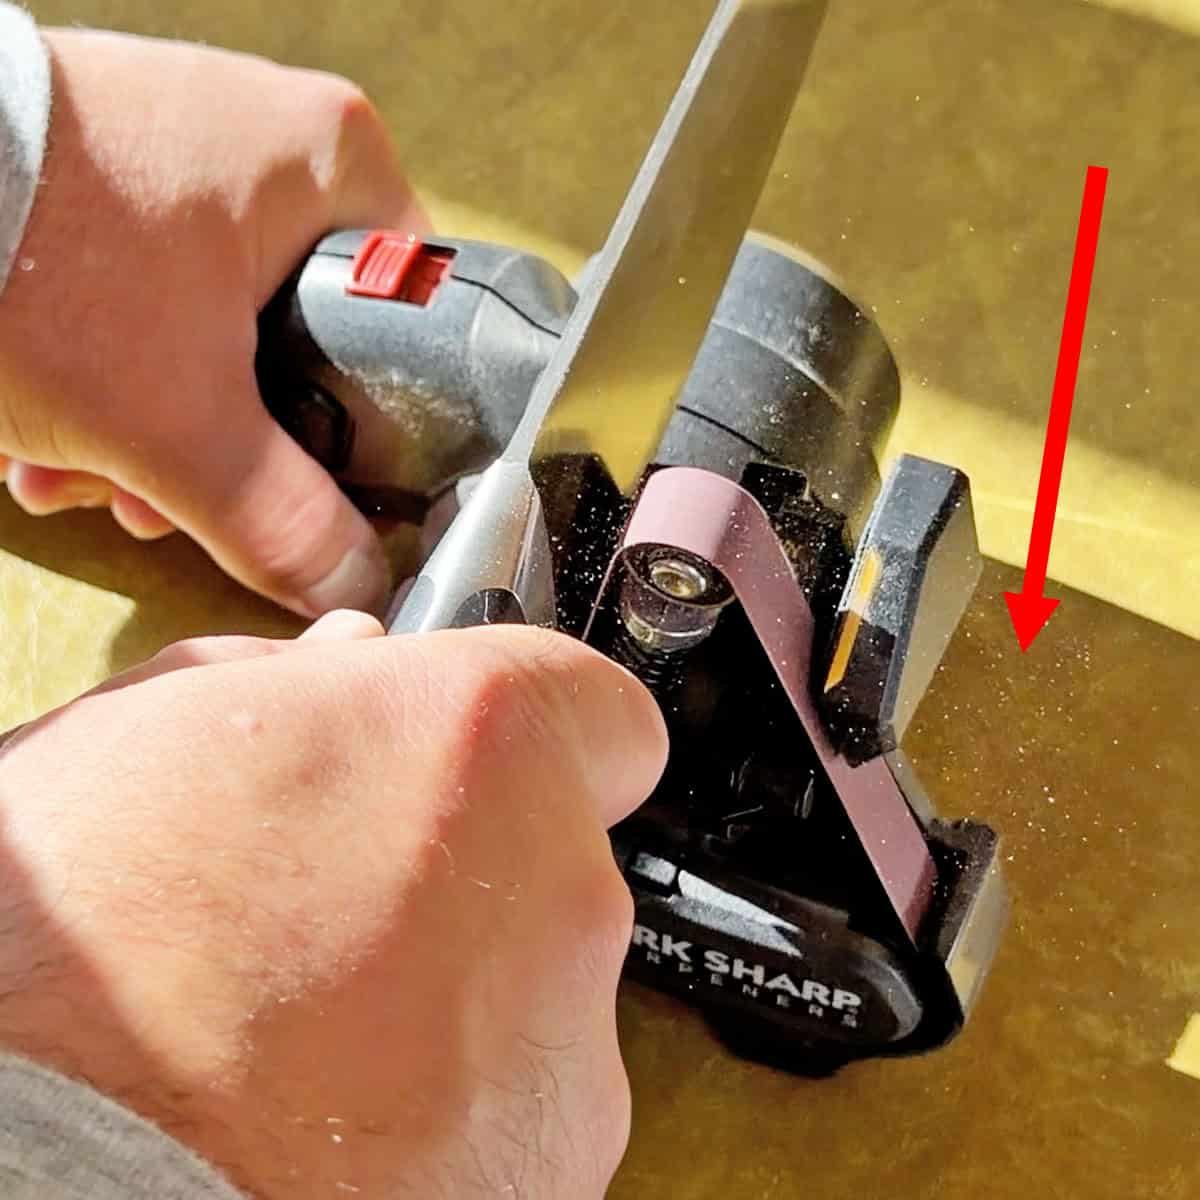
There are ways to manage the dust, but for most home cooks, it’s a pain.
If you already own Work Sharp tools or sharpen knives outside the kitchen, this type can make sense. For everyday kitchen use, I’d choose an electric pull-through sharpener or whetstones instead.
Fixed-Angle Systems
Fixed-angle sharpening systems look complicated, but most are pretty simple once you understand the basic setup.
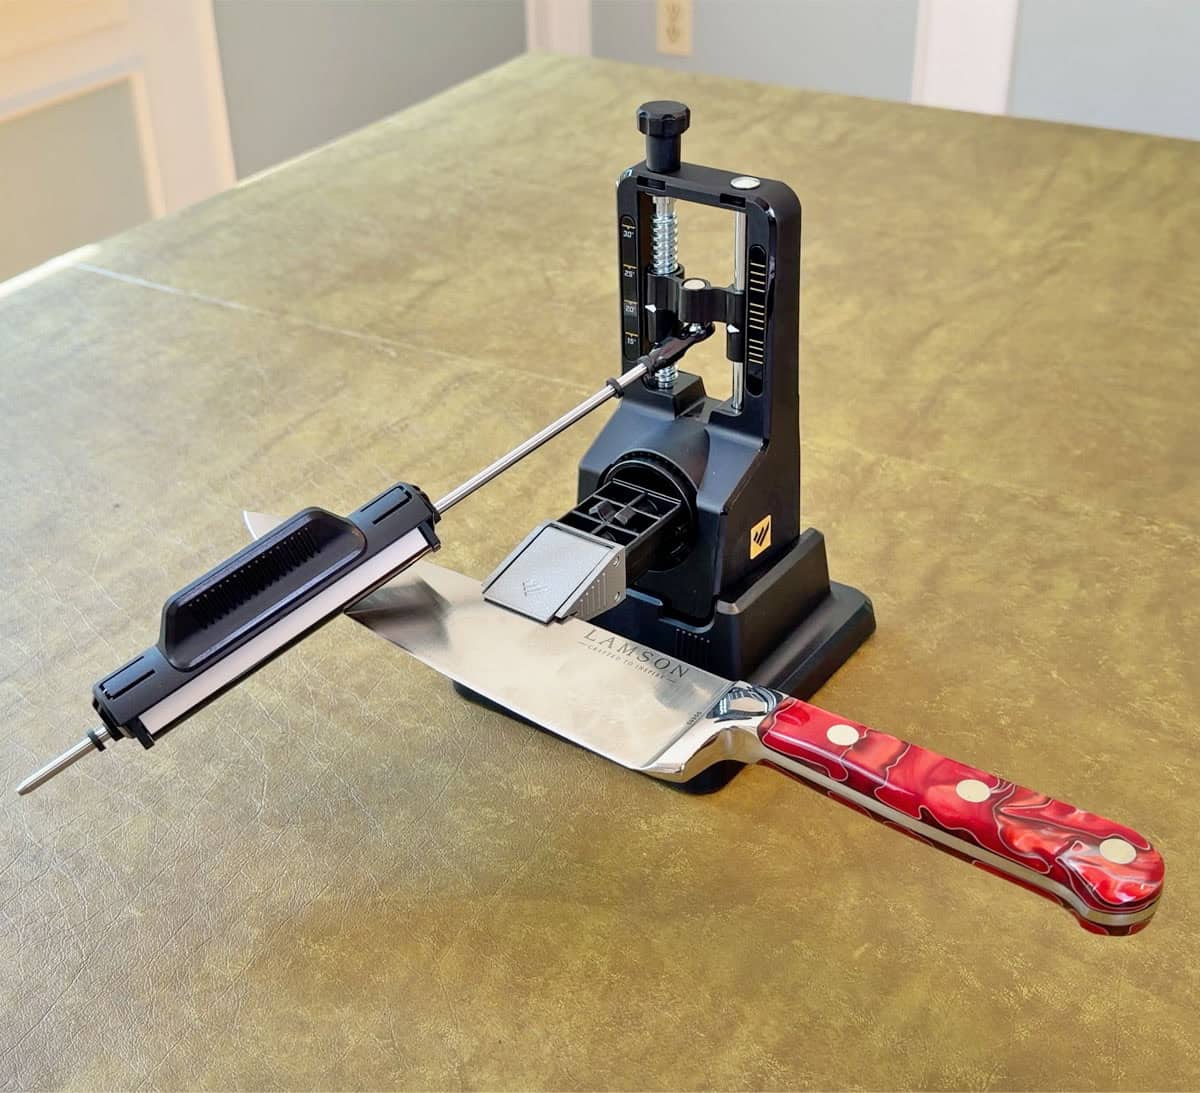
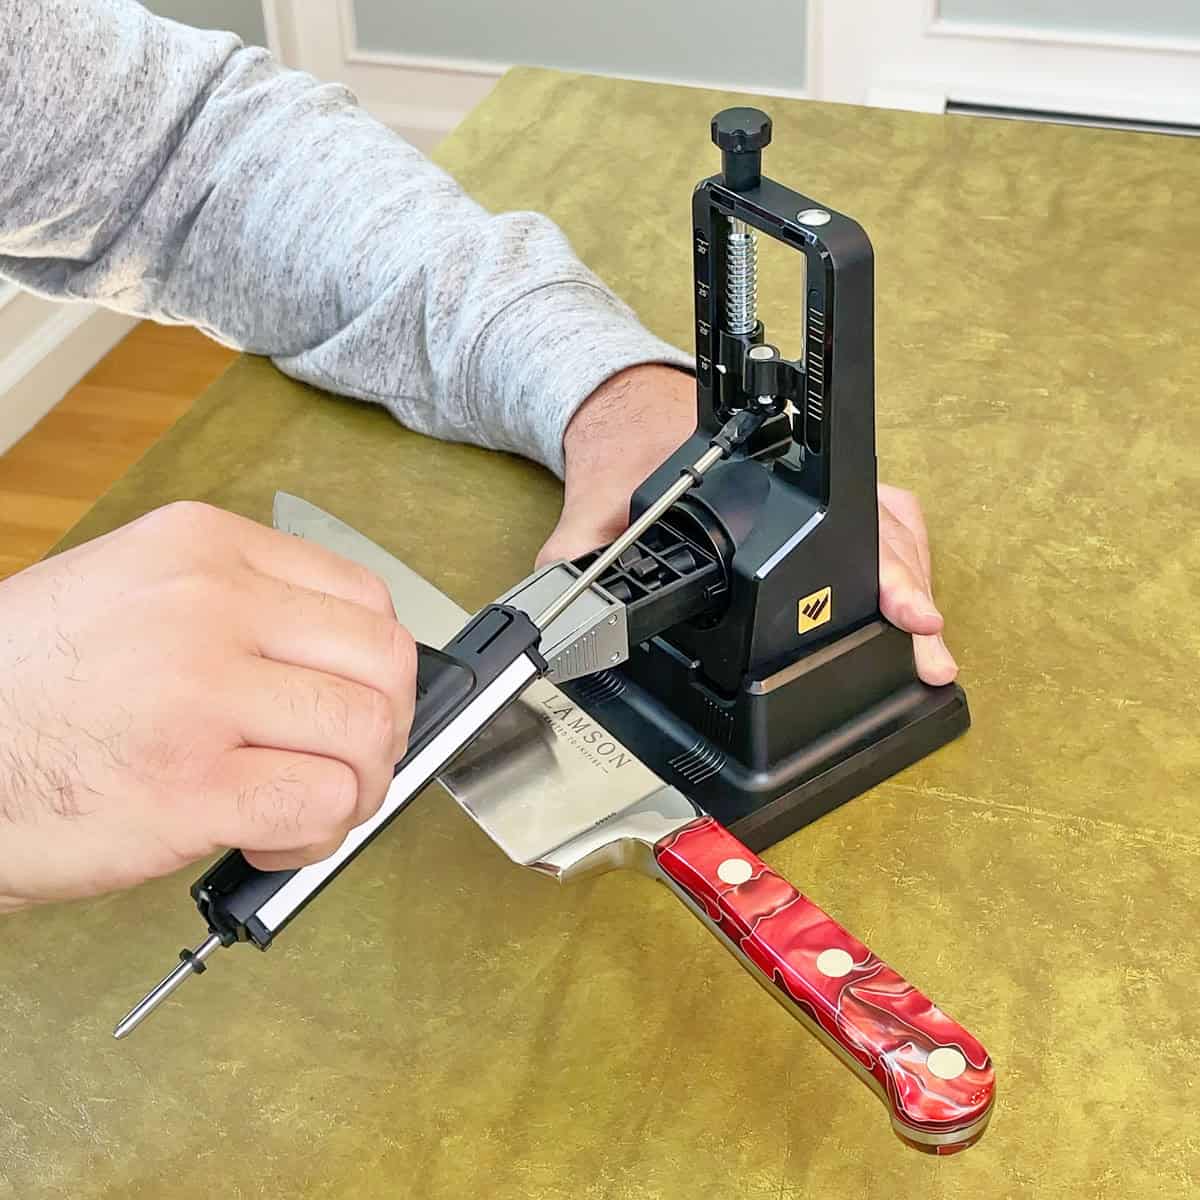
You snap the tower into the base, attach the magnetic sharpening rod, clamp the knife in place, set the angle, and start sharpening.
With this type of sharpener, the knife stays still and you move the abrasive stone back and forth along the edge. Then you flip the knife over and repeat the same process on the other side.
The main benefit is control. You can choose the exact angle, and the rod holds that angle for you as you sharpen.
The edge is also right in front of you, so you can clearly see the results as you work.
In my testing, the Work Sharp Precision Adjust results were inconsistent.
The cheap Chef Craft knife started at 684 BESS and only improved to 643 after the first sharpening. After a second sharpening, it reached 457, which still isn’t very sharp.
The Lamson Premier Forged knife started at 701, improved to 571, then got worse after the second sharpening and finished at 641.
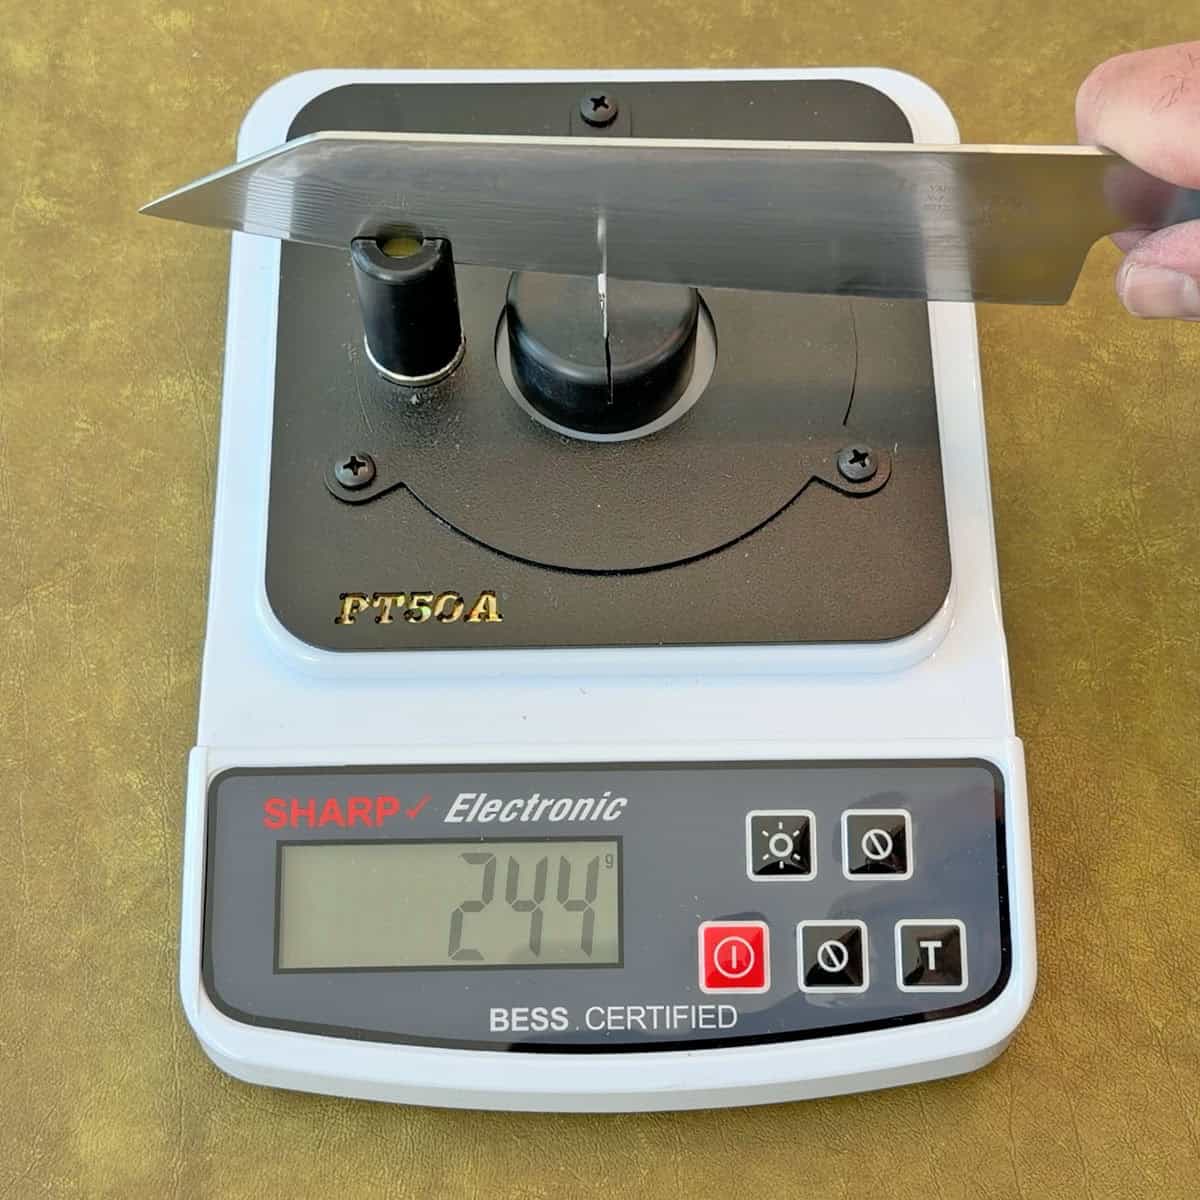
The Cangshan Yari did much better. It started at 537, improved to 253, and finished at 244 after a second sharpening.
So the system can work, but it didn’t perform consistently across all three knives.
It’s also kind of a pain to use. It doesn’t take long to assemble, but you still have to clamp the knife tightly, set the angle, sharpen one side, rotate the knife, sharpen the other side, and repeat that process as you work through the grits.
Because the knife has to be clamped securely, it takes some effort to loosen it when you’re done. With one or two knives, that’s no big deal. If you’re sharpening a bunch at once, it gets annoying.
The actual sharpening is repetitive, too. The stone is short, so you have to make a lot of back-and-forth passes across the blade. If you’re fixing a really dull or damaged knife, that can put strain on your arm and shoulder.
One other thing I noticed with this Work Sharp model is that the base and clamp had some flex and movement. I had to hold it down with one hand, and even then it bounced slightly.
You also need to be careful. Your hand is moving back and forth close to a sharp edge, and with this model, the whole sharpener can tip if you’re not holding it steady.
To be fair, there are many fixed-angle systems, and some are much sturdier than this one. So not every issue I ran into applies to every model.
If you’re considering one, look closely at the clamp, base stability, stone length, and angle range. Those details matter more than they seem.
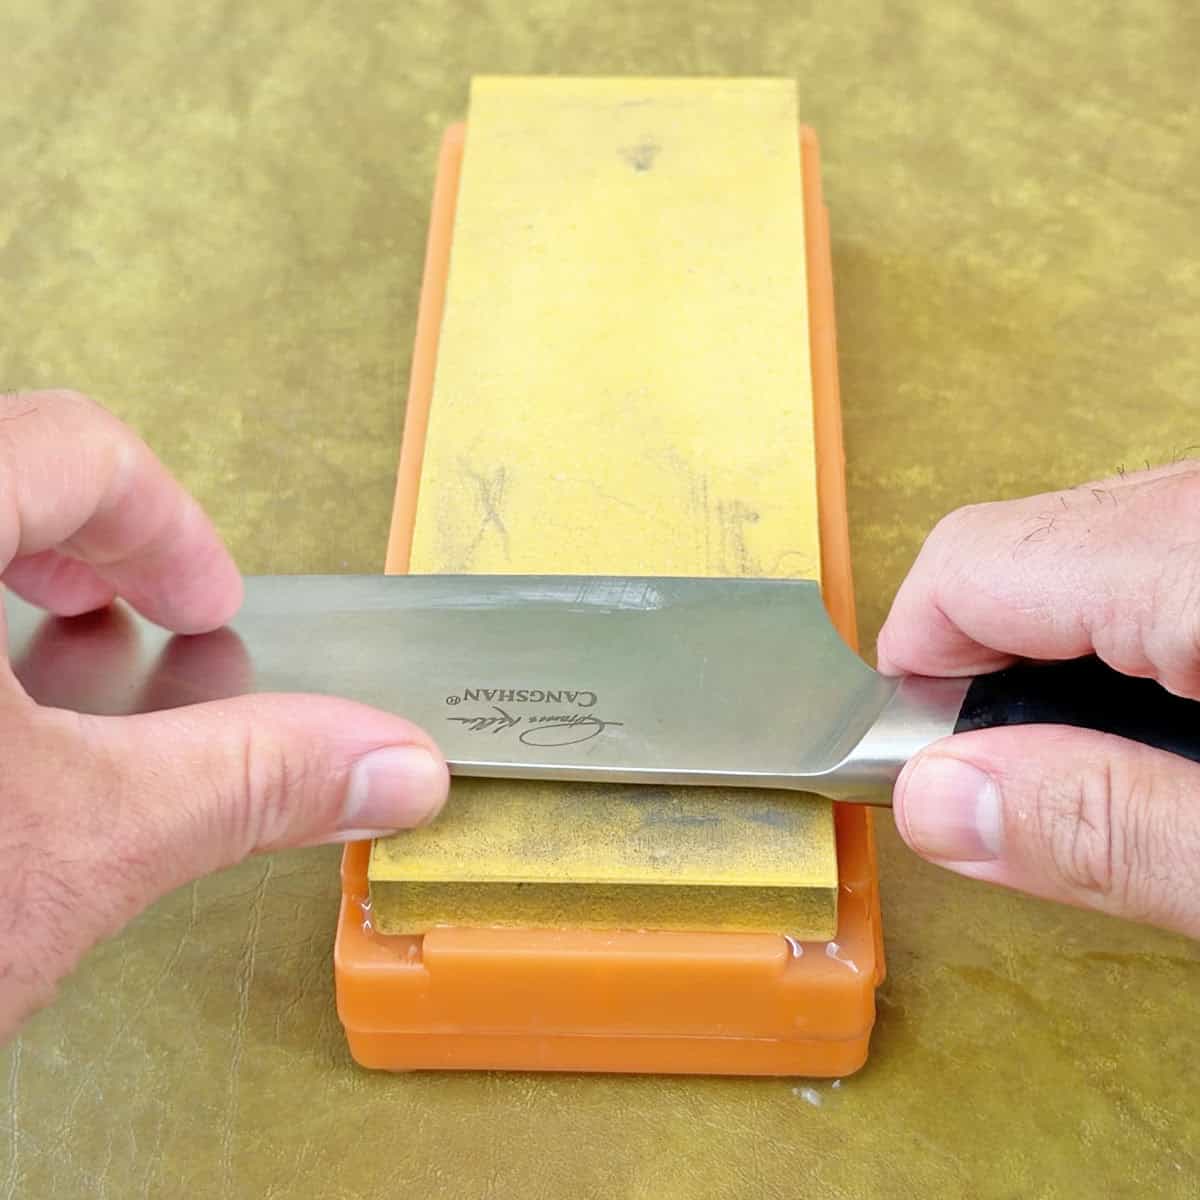
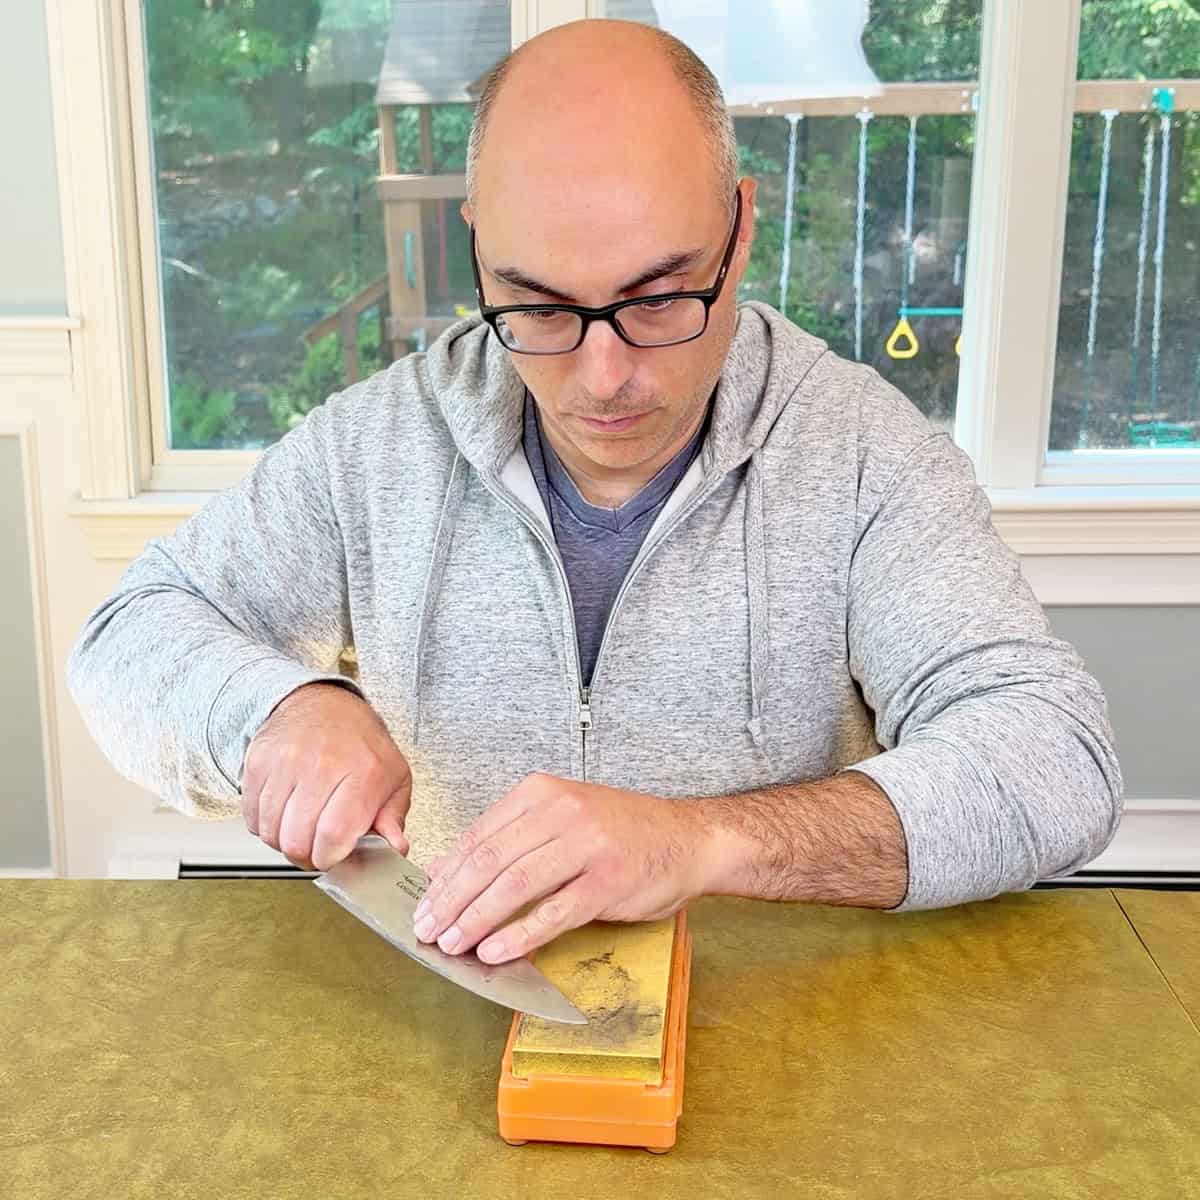
Whetstones
A whetstone is the simplest option, but it has the highest learning curve.
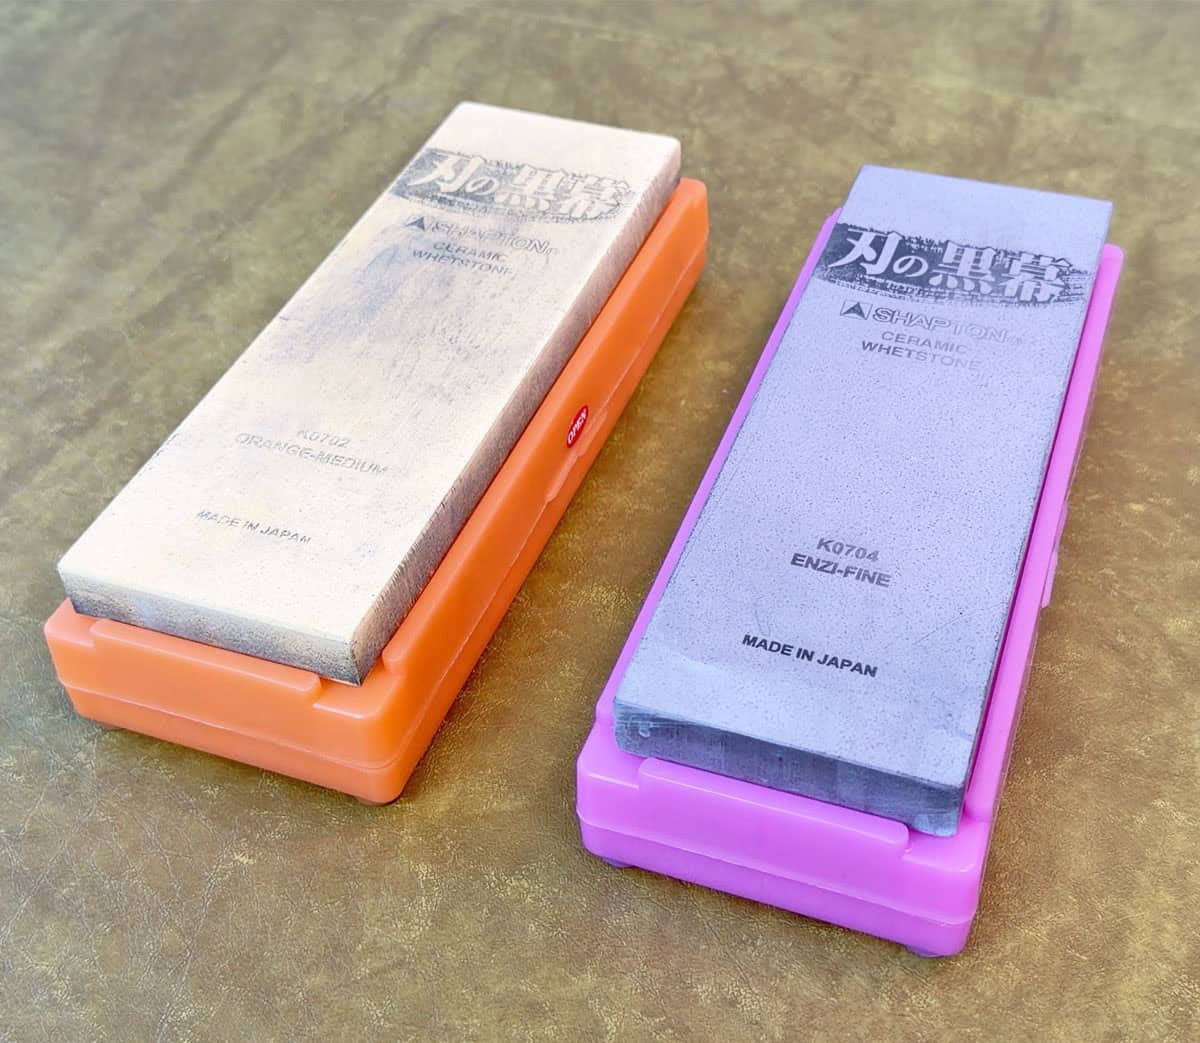
You put it on the counter, add water if the stone requires it, hold the knife at the correct angle, and move the blade across the stone to grind a new edge.
Some stones need to soak before use. Others, like the Shapton stones I tested, are splash-and-go. You just add a little water and start sharpening.
The biggest advantage is flexibility. You can sharpen almost any knife, any shape, any size, and any angle.
You’re not limited to preset slots, fixed guides, or whatever angle the sharpener gives you.
In my testing, the Shapton whetstones worked really well.
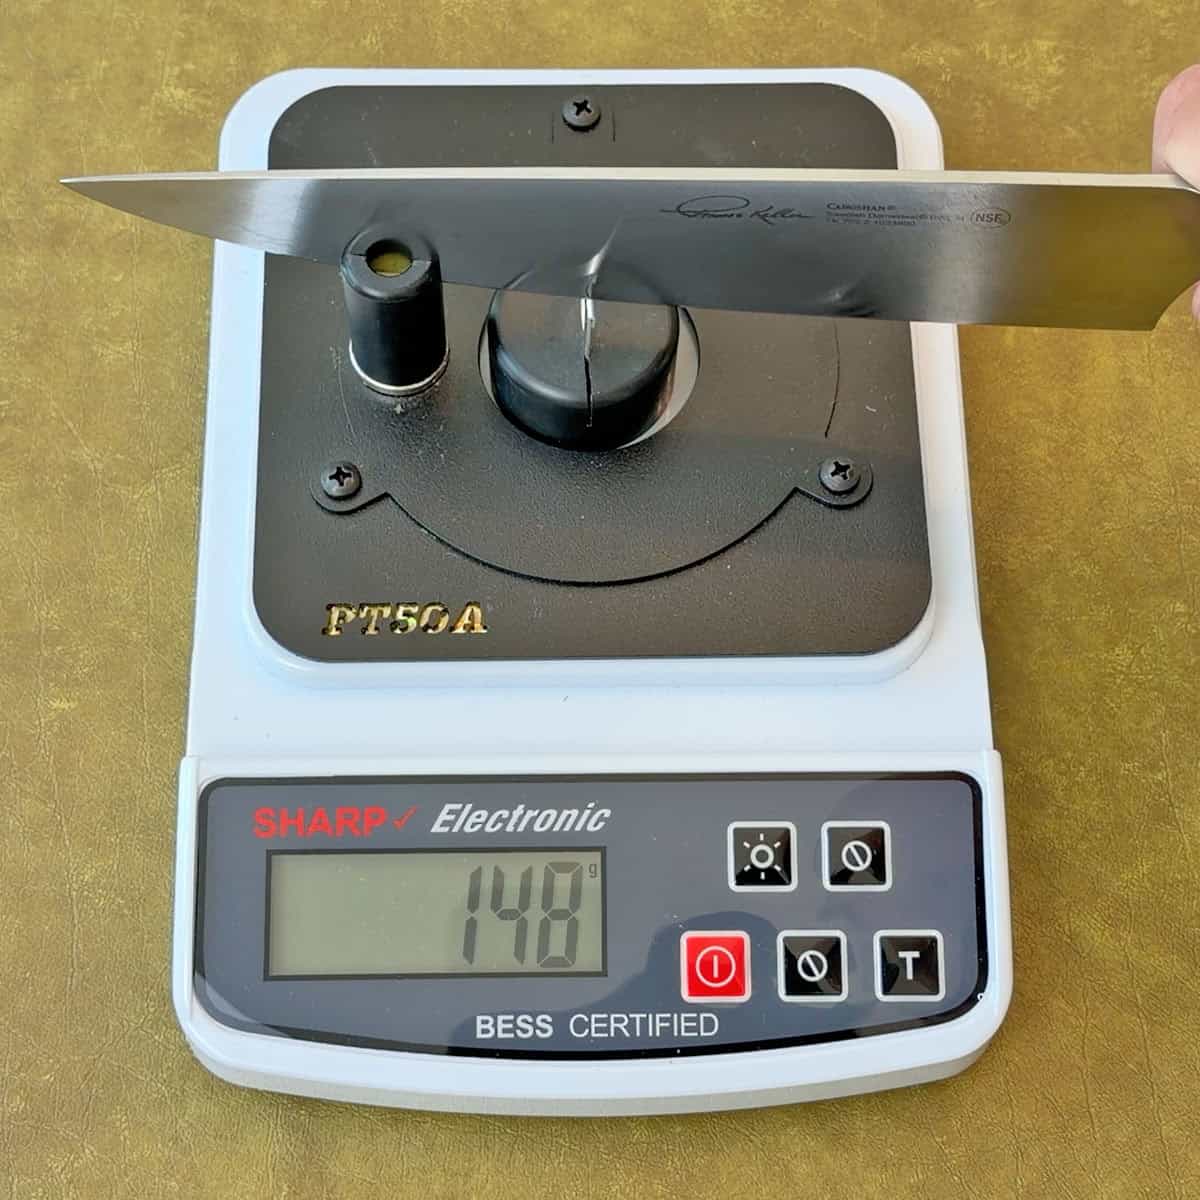
The cheap Chef Craft knife started at 1035 BESS and finished at 211. The Zwilling Pro started at 941 and finished at 266. The Cangshan Thomas Keller knife started at 462 and finished at 148.
All three passed the paper test. The tomato and pepper cuts were noticeably cleaner than most of the other sharpeners.
The results were not quite as sharp as the best electric pull-through and belt sharpener results, but they were consistently good across all three knives.
The downside is that whetstones take practice. Unlike the other systems, nothing holds the angle for you.
You have to find the right angle and keep it consistent as you move the knife across the stone. If you lift your wrist, tilt the blade, or change the angle as you go, you can sharpen unevenly or remove metal where you didn’t mean to.
There’s a reason there are thousands of videos about how to use a whetstone, plus all sorts of gadgets and tricks to make the process easier.
They’re also messier than most sharpeners. You’re using water, the stone creates slurry, and you need to rinse everything off when you’re done.
The scraping sound isn’t the most pleasant either. In my noise test, the whetstones measured in the mid 60-decibel range, so they weren’t loud, but the sound is still noticeable.
Even with the learning curve, I think whetstones are worth learning if you care about knives and have the patience. They’re affordable, easy to store, and extremely flexible.
Bottom Line: Which Knife Sharpener Type Is Best?
The best knife sharpener type for most home cooks is an electric pull-through sharpener. It’s fast, easy, and in my tests, the Chef’sChoice 15XV produced some of the sharpest edges with the least effort.
Whetstones are the best long-term option if you want control and are willing to practice. They work on the widest range of knives, and the results were consistently strong.
Rolling sharpeners are a good middle ground, but they’re slower on very dull knives and can be expensive. Manual pull-through sharpeners, fixed-angle systems, and electric belt sharpeners all have their place, but they wouldn’t be my first choice for most home kitchens.
You can check the latest prices for the sharpeners I tested here:

